March 17-April 2, 2025: What if you could install HVAC equipment that’s less than half in size compared to your neighbors? You can when you build like we do. The smaller check you cut to your installer is the first payoff you get for doing a bang-up job with your thermal envelope, explained in my blog post Testing Our Work. The payoff continues month after month: my energy model predicts it will cost a mere $50 a month to keep the 2025 Poem Home comfortable, in weather over 100 degrees in summer or minus 20 in winter.
Our super-insulated and super-air-tight home can be heated and cooled with a single 9,000 Btu/hour ductless mini-split. A new home passing inspection under Wisconsin’s Uniform Dwelling Code’s minimum standard can be so poorly built that it would require three of these units. By spending more upfront on insulation, tape, and caulk, our homeowner saved approximately $12,000 on equipment not purchased.
The 2025 Poem Home’s heating load is predicted to be 6.9 Btu/hour/square foot.
The same home in shape and size built to Wisconsin’s Code would have a heating load of 17 Btu/hour/square foot.
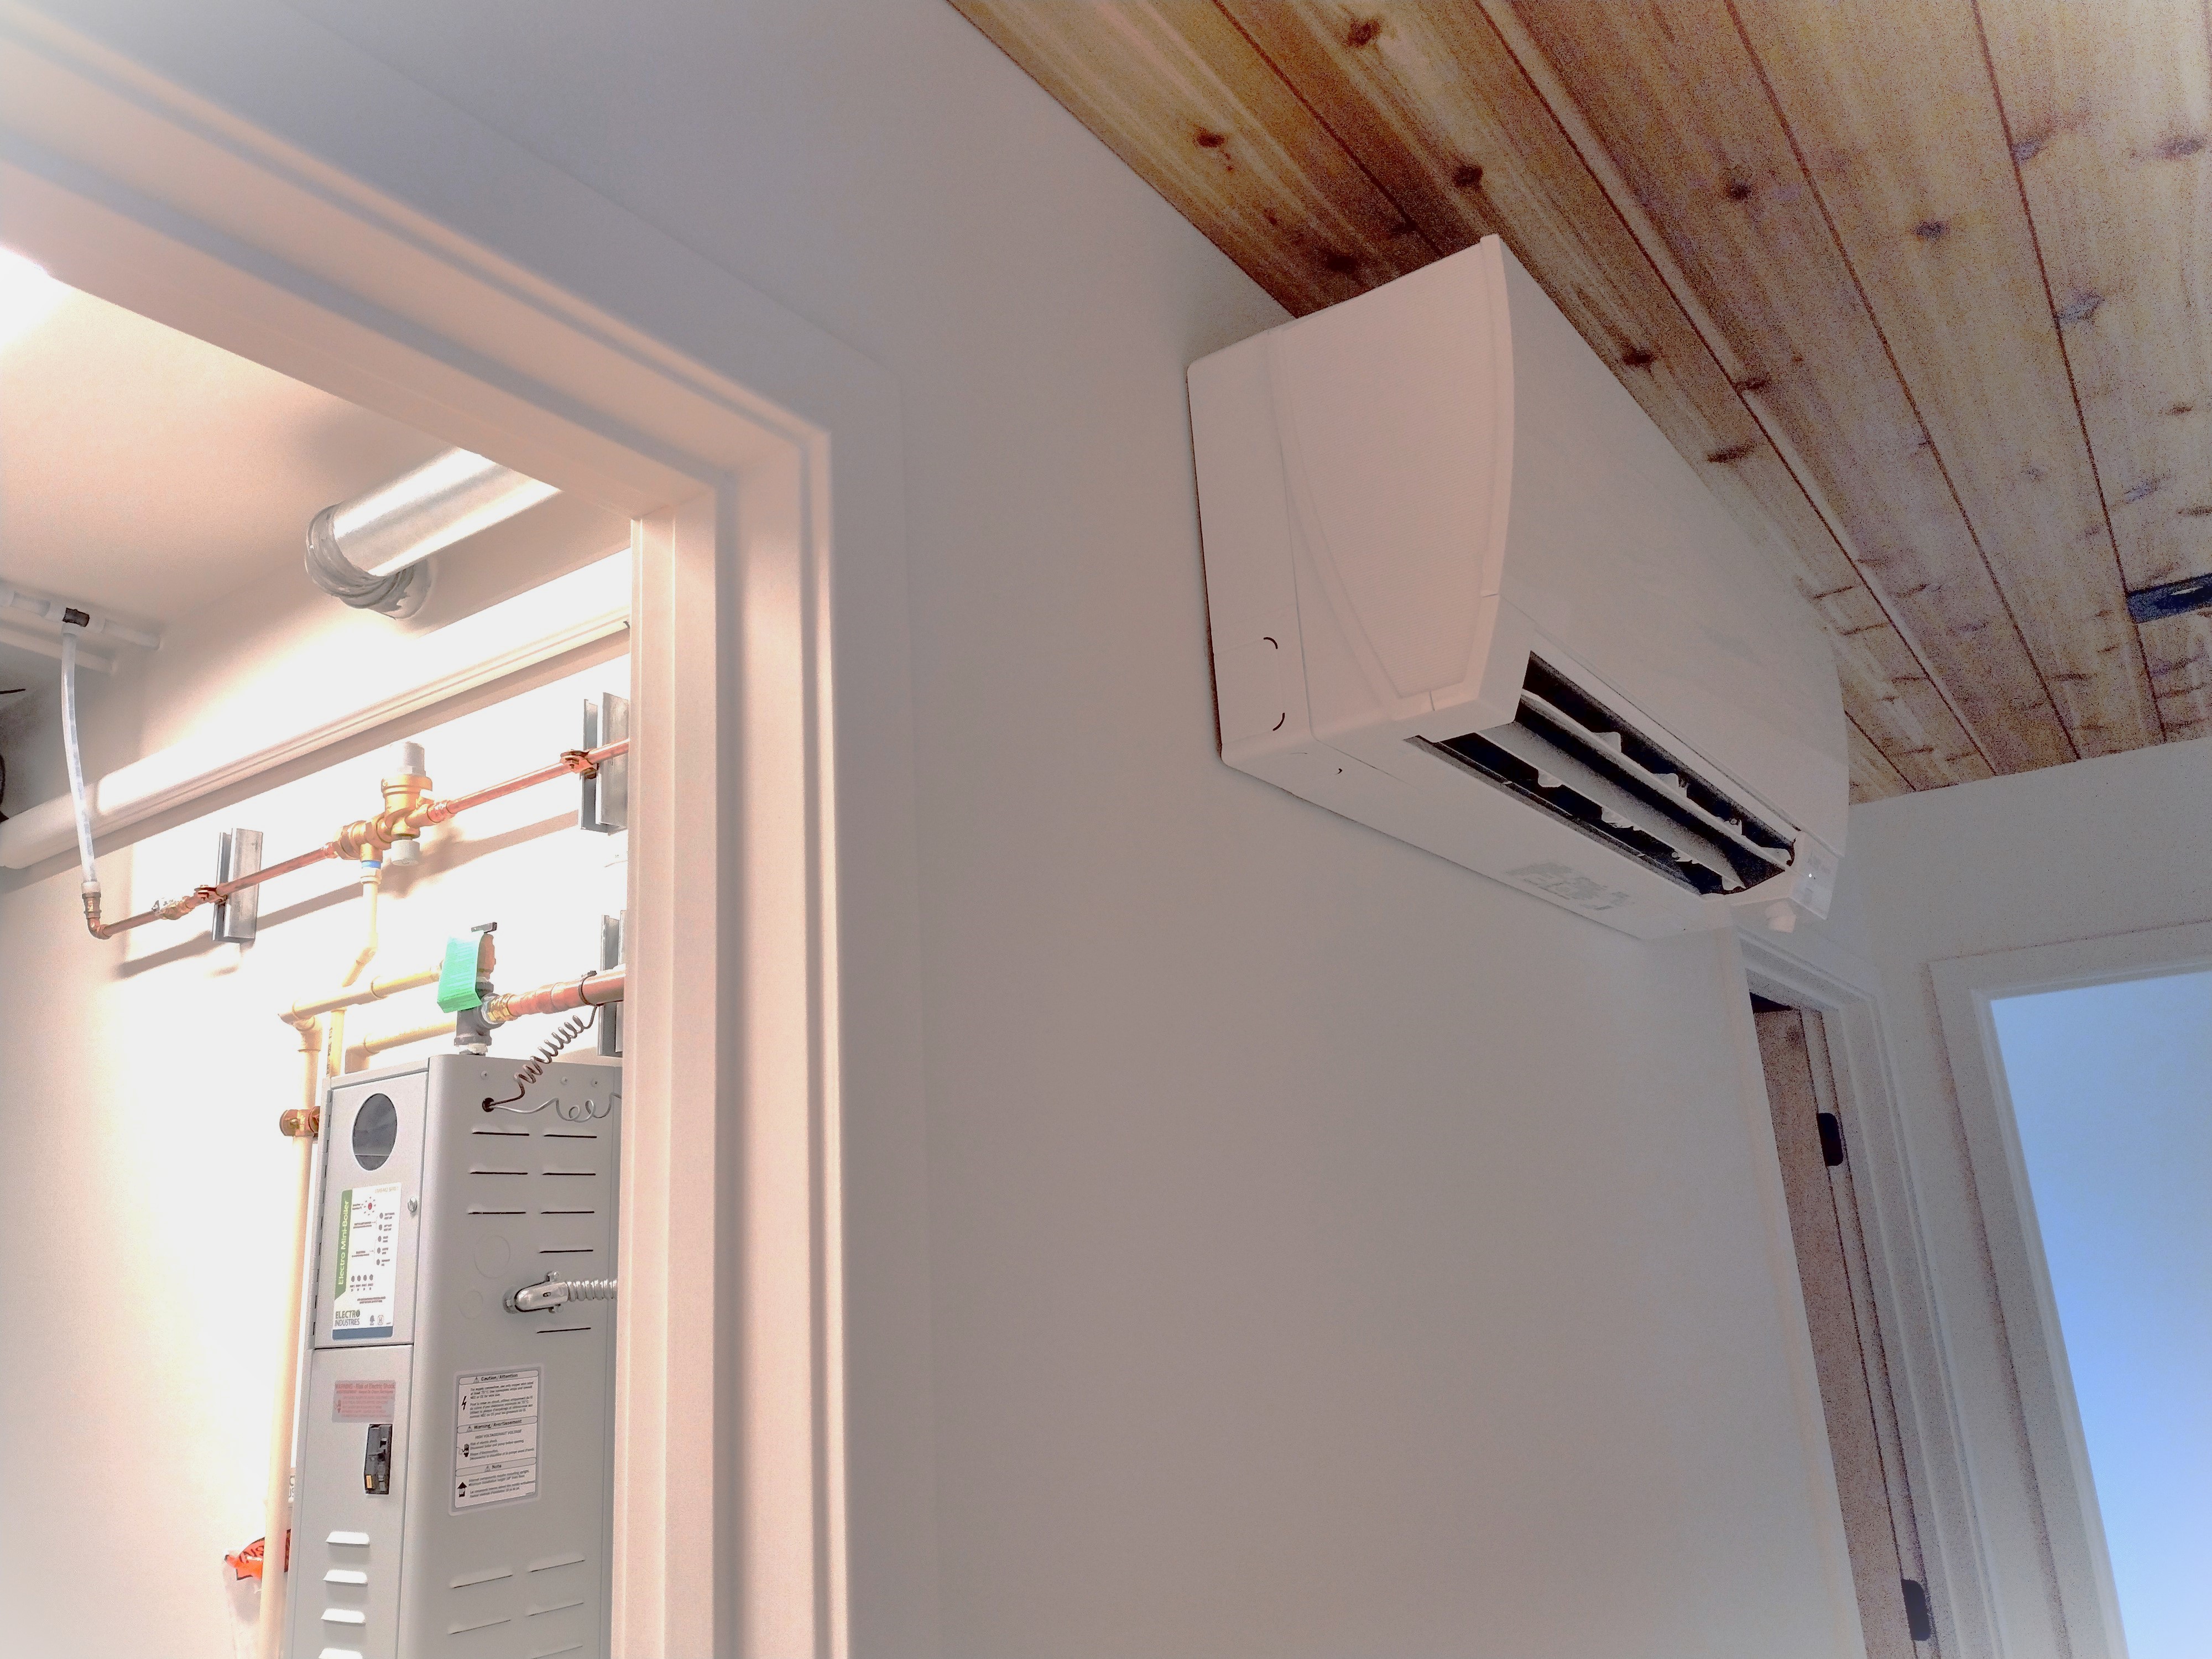
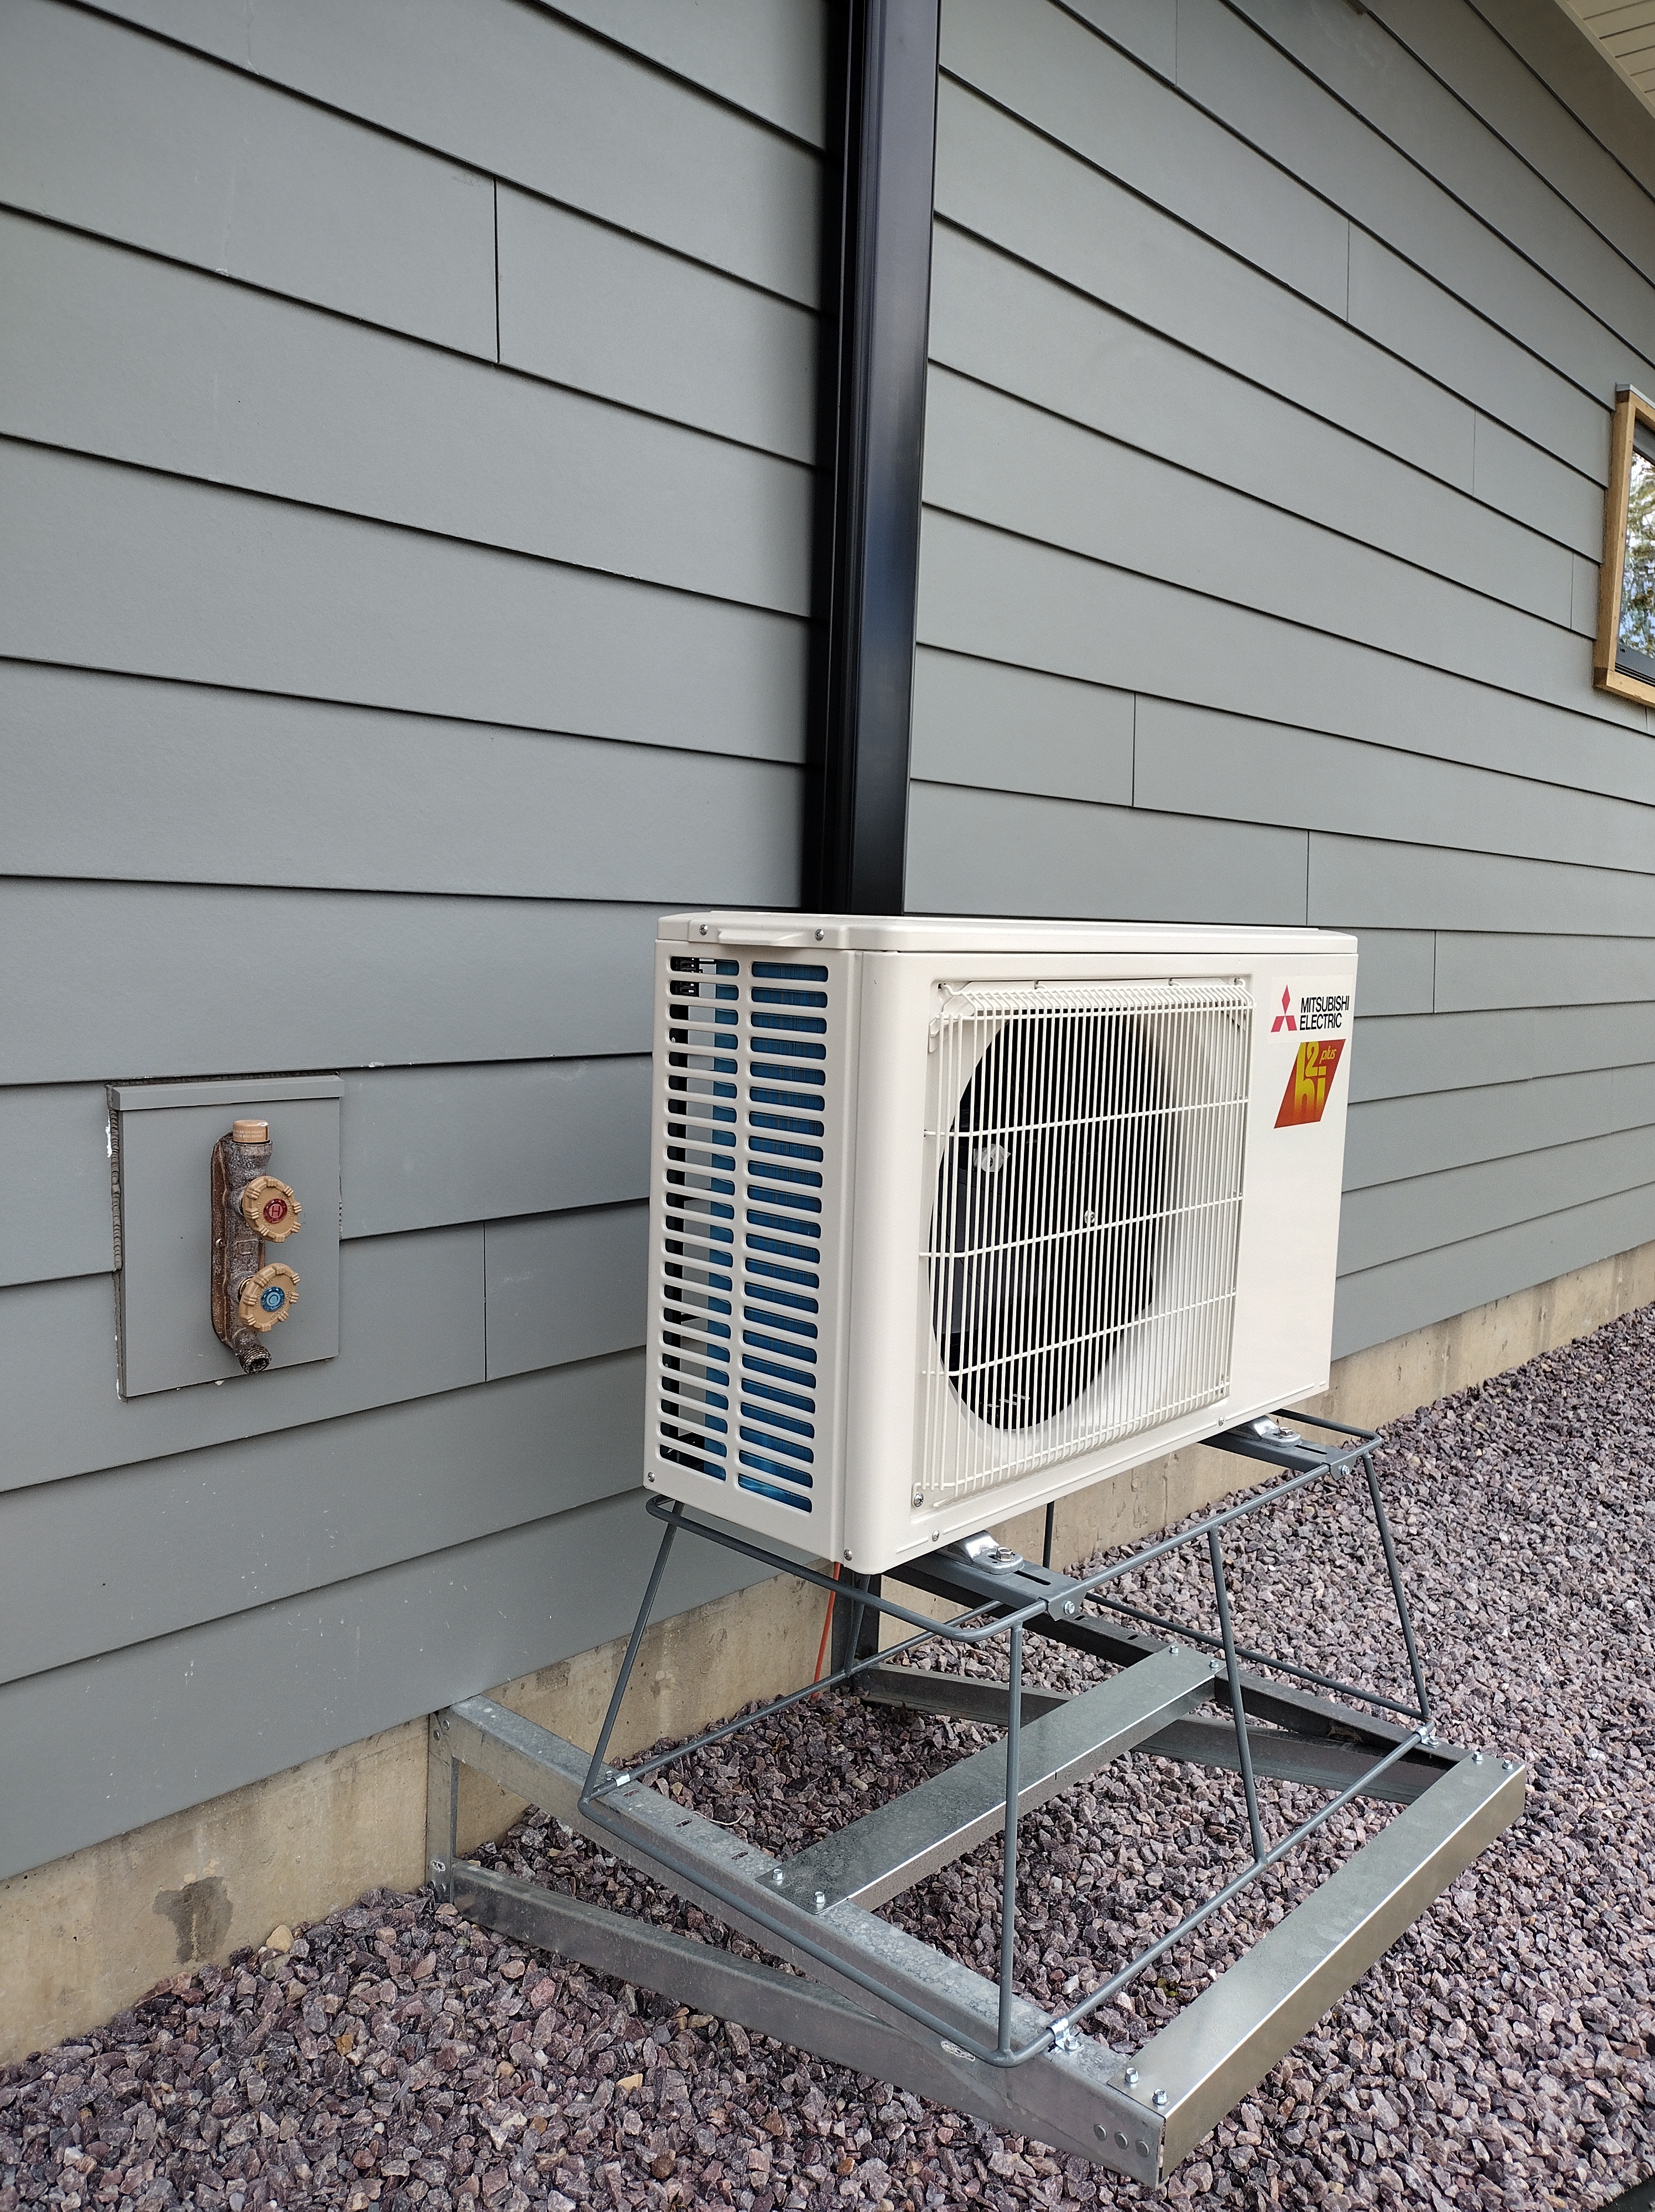
Here’s the ductless mini-split system my contractor installed. I chose Mitsubishi’s Hyper-Heat model. The indoor unit, located in the hallway next to the mechanical room, opens its vanes to push either cool or warm air downward for distribution throughout the house. The outdoor heat pump, located directly behind the mechanical room on the north side of the house, works in concert with the indoor unit to transfer thermal energy back and forth, in a way similar to your refrigerator. When the deep cold of winter arrives and temperatures drop to minus 13 degrees, the equipment will still hum along, squeezing heat energy out of the dense, biting air.
The Air Source Heat Pump or ASHP is mounted on a metal stand that is in turn mounted to galvanized steel angles assembled as a bracket bolted to the foundation. Any vibrations or noise will be absorbed by the concrete, not transmitted through the walls. This arrangement eliminates any settling, often experienced with ground-mounted pads, and allows for good air circulation and snow removal.
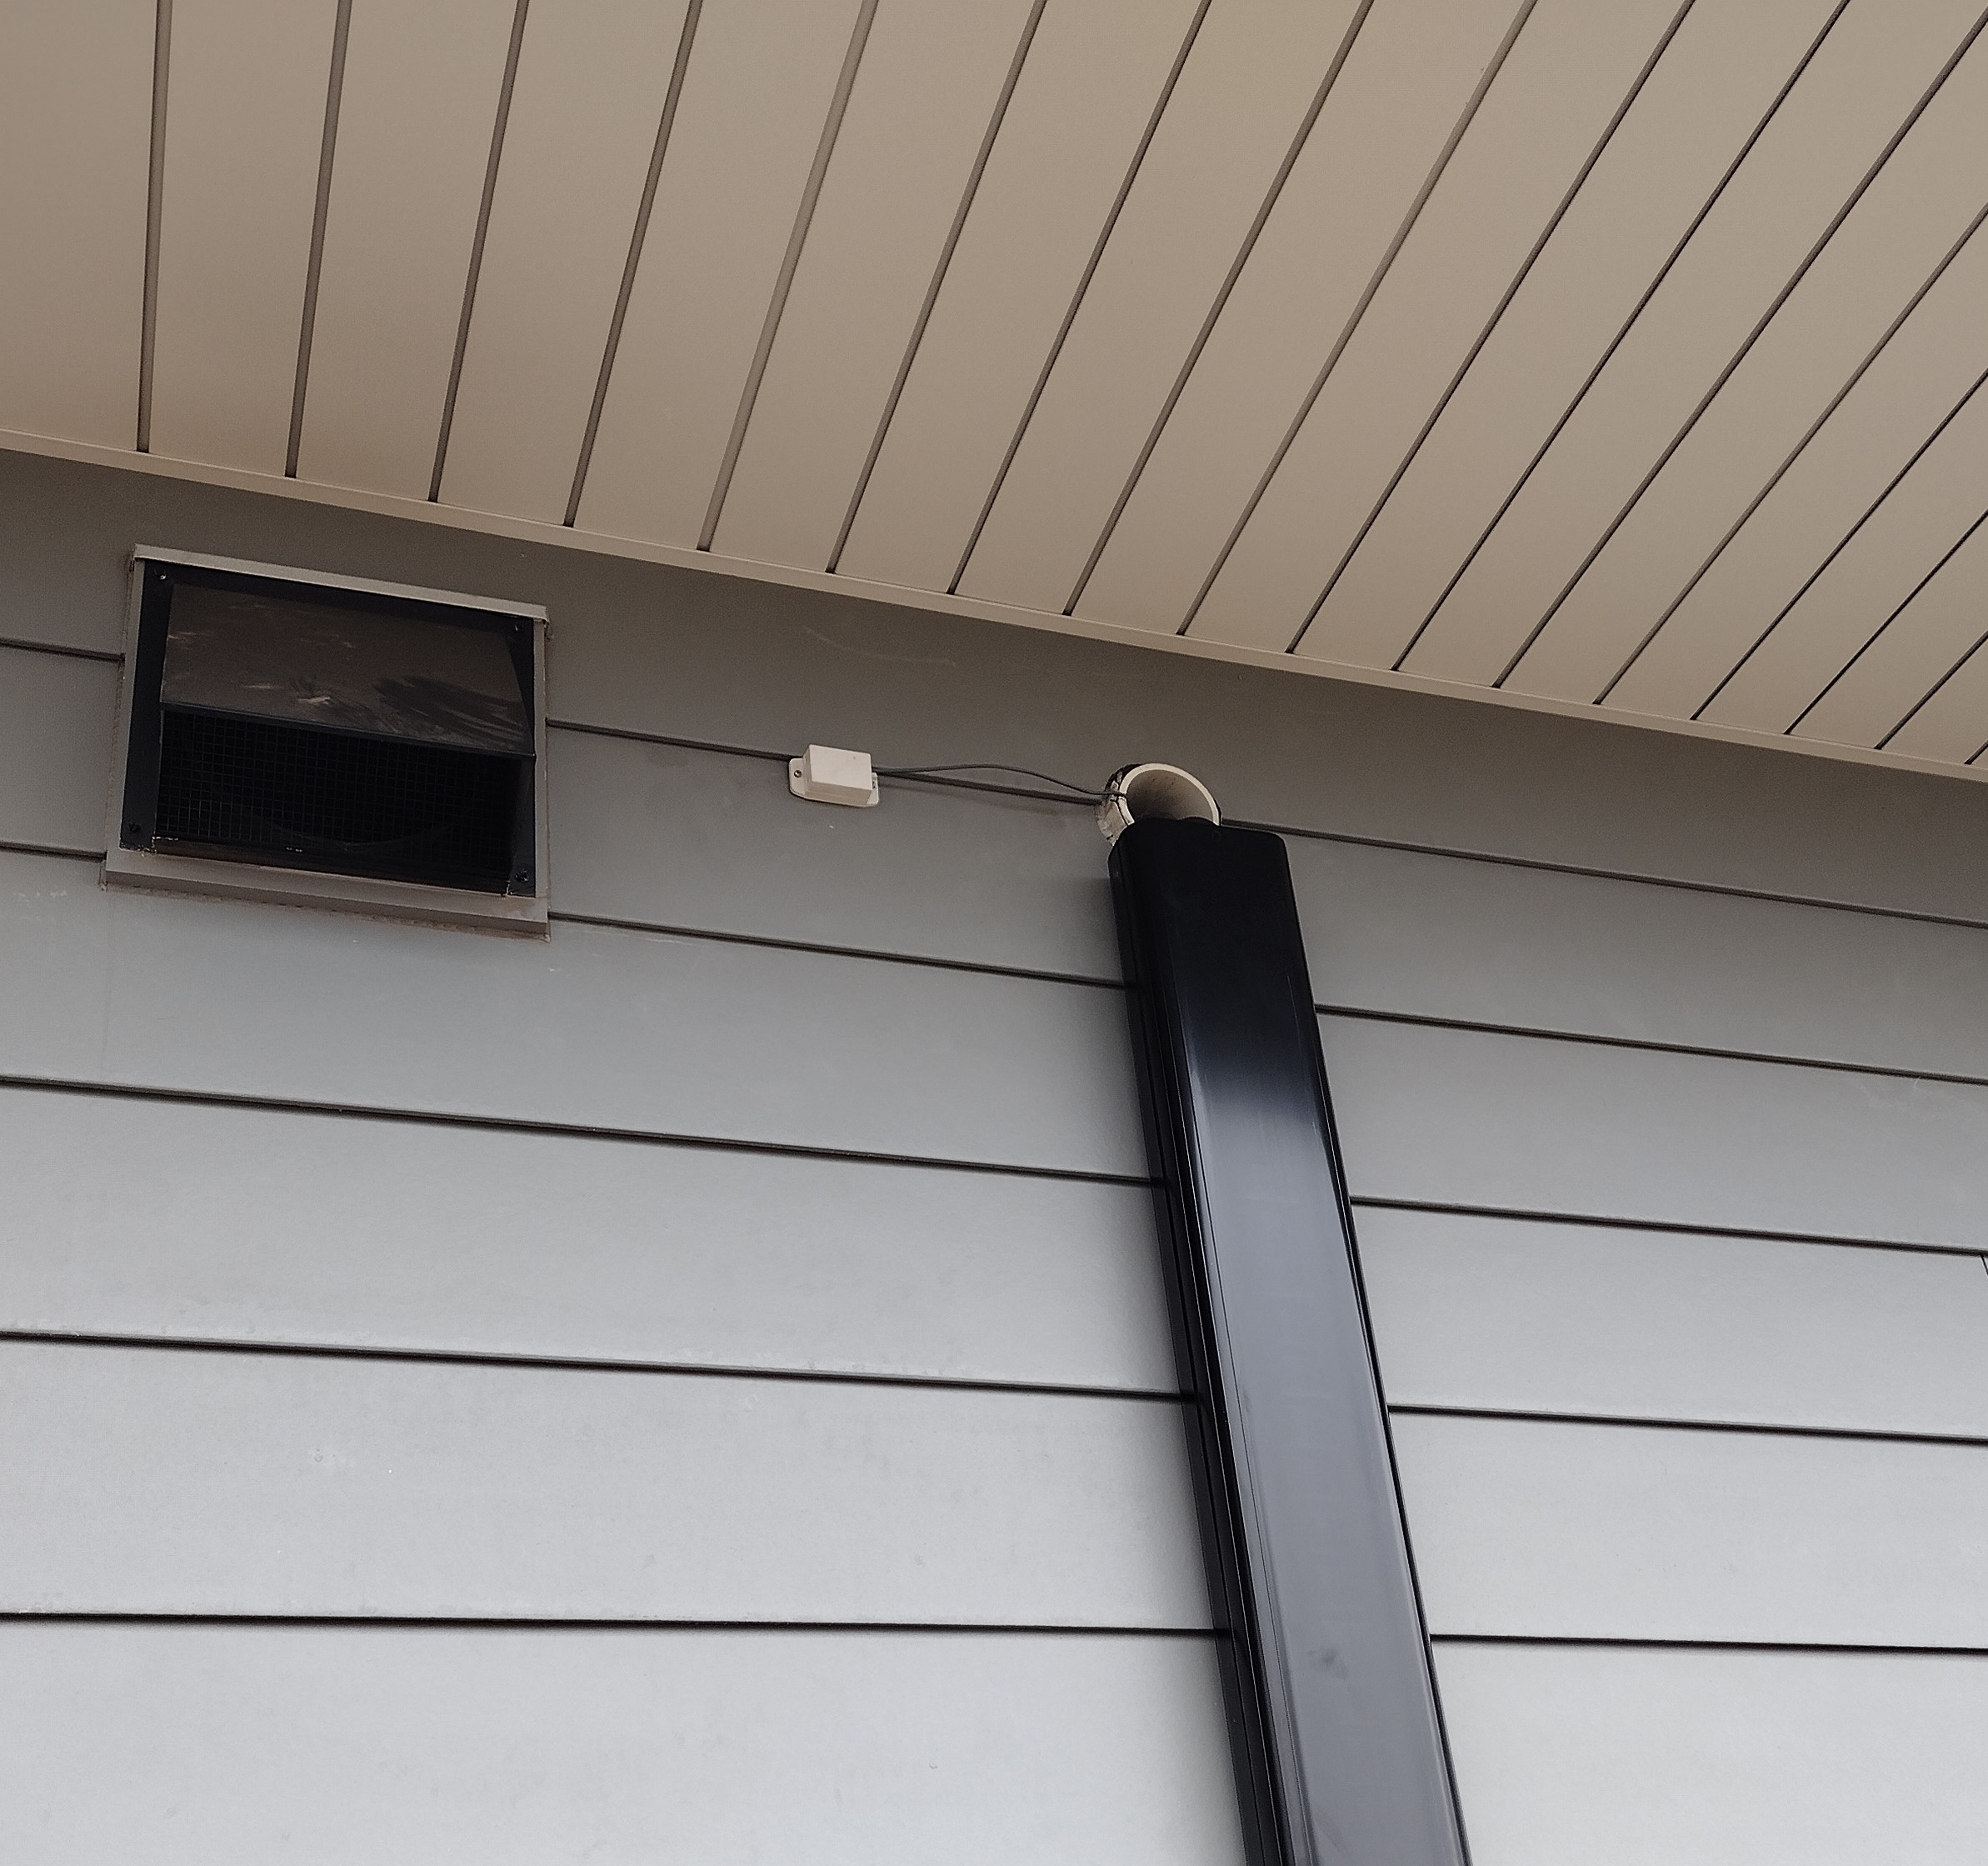
Instead of burying the refrigerant lines inside the wall, we surface mounted them to the siding, seen here protected by a black plastic line set cover. In the mechanical room, the refrigerant lines are concealed behind a white plastic cover.
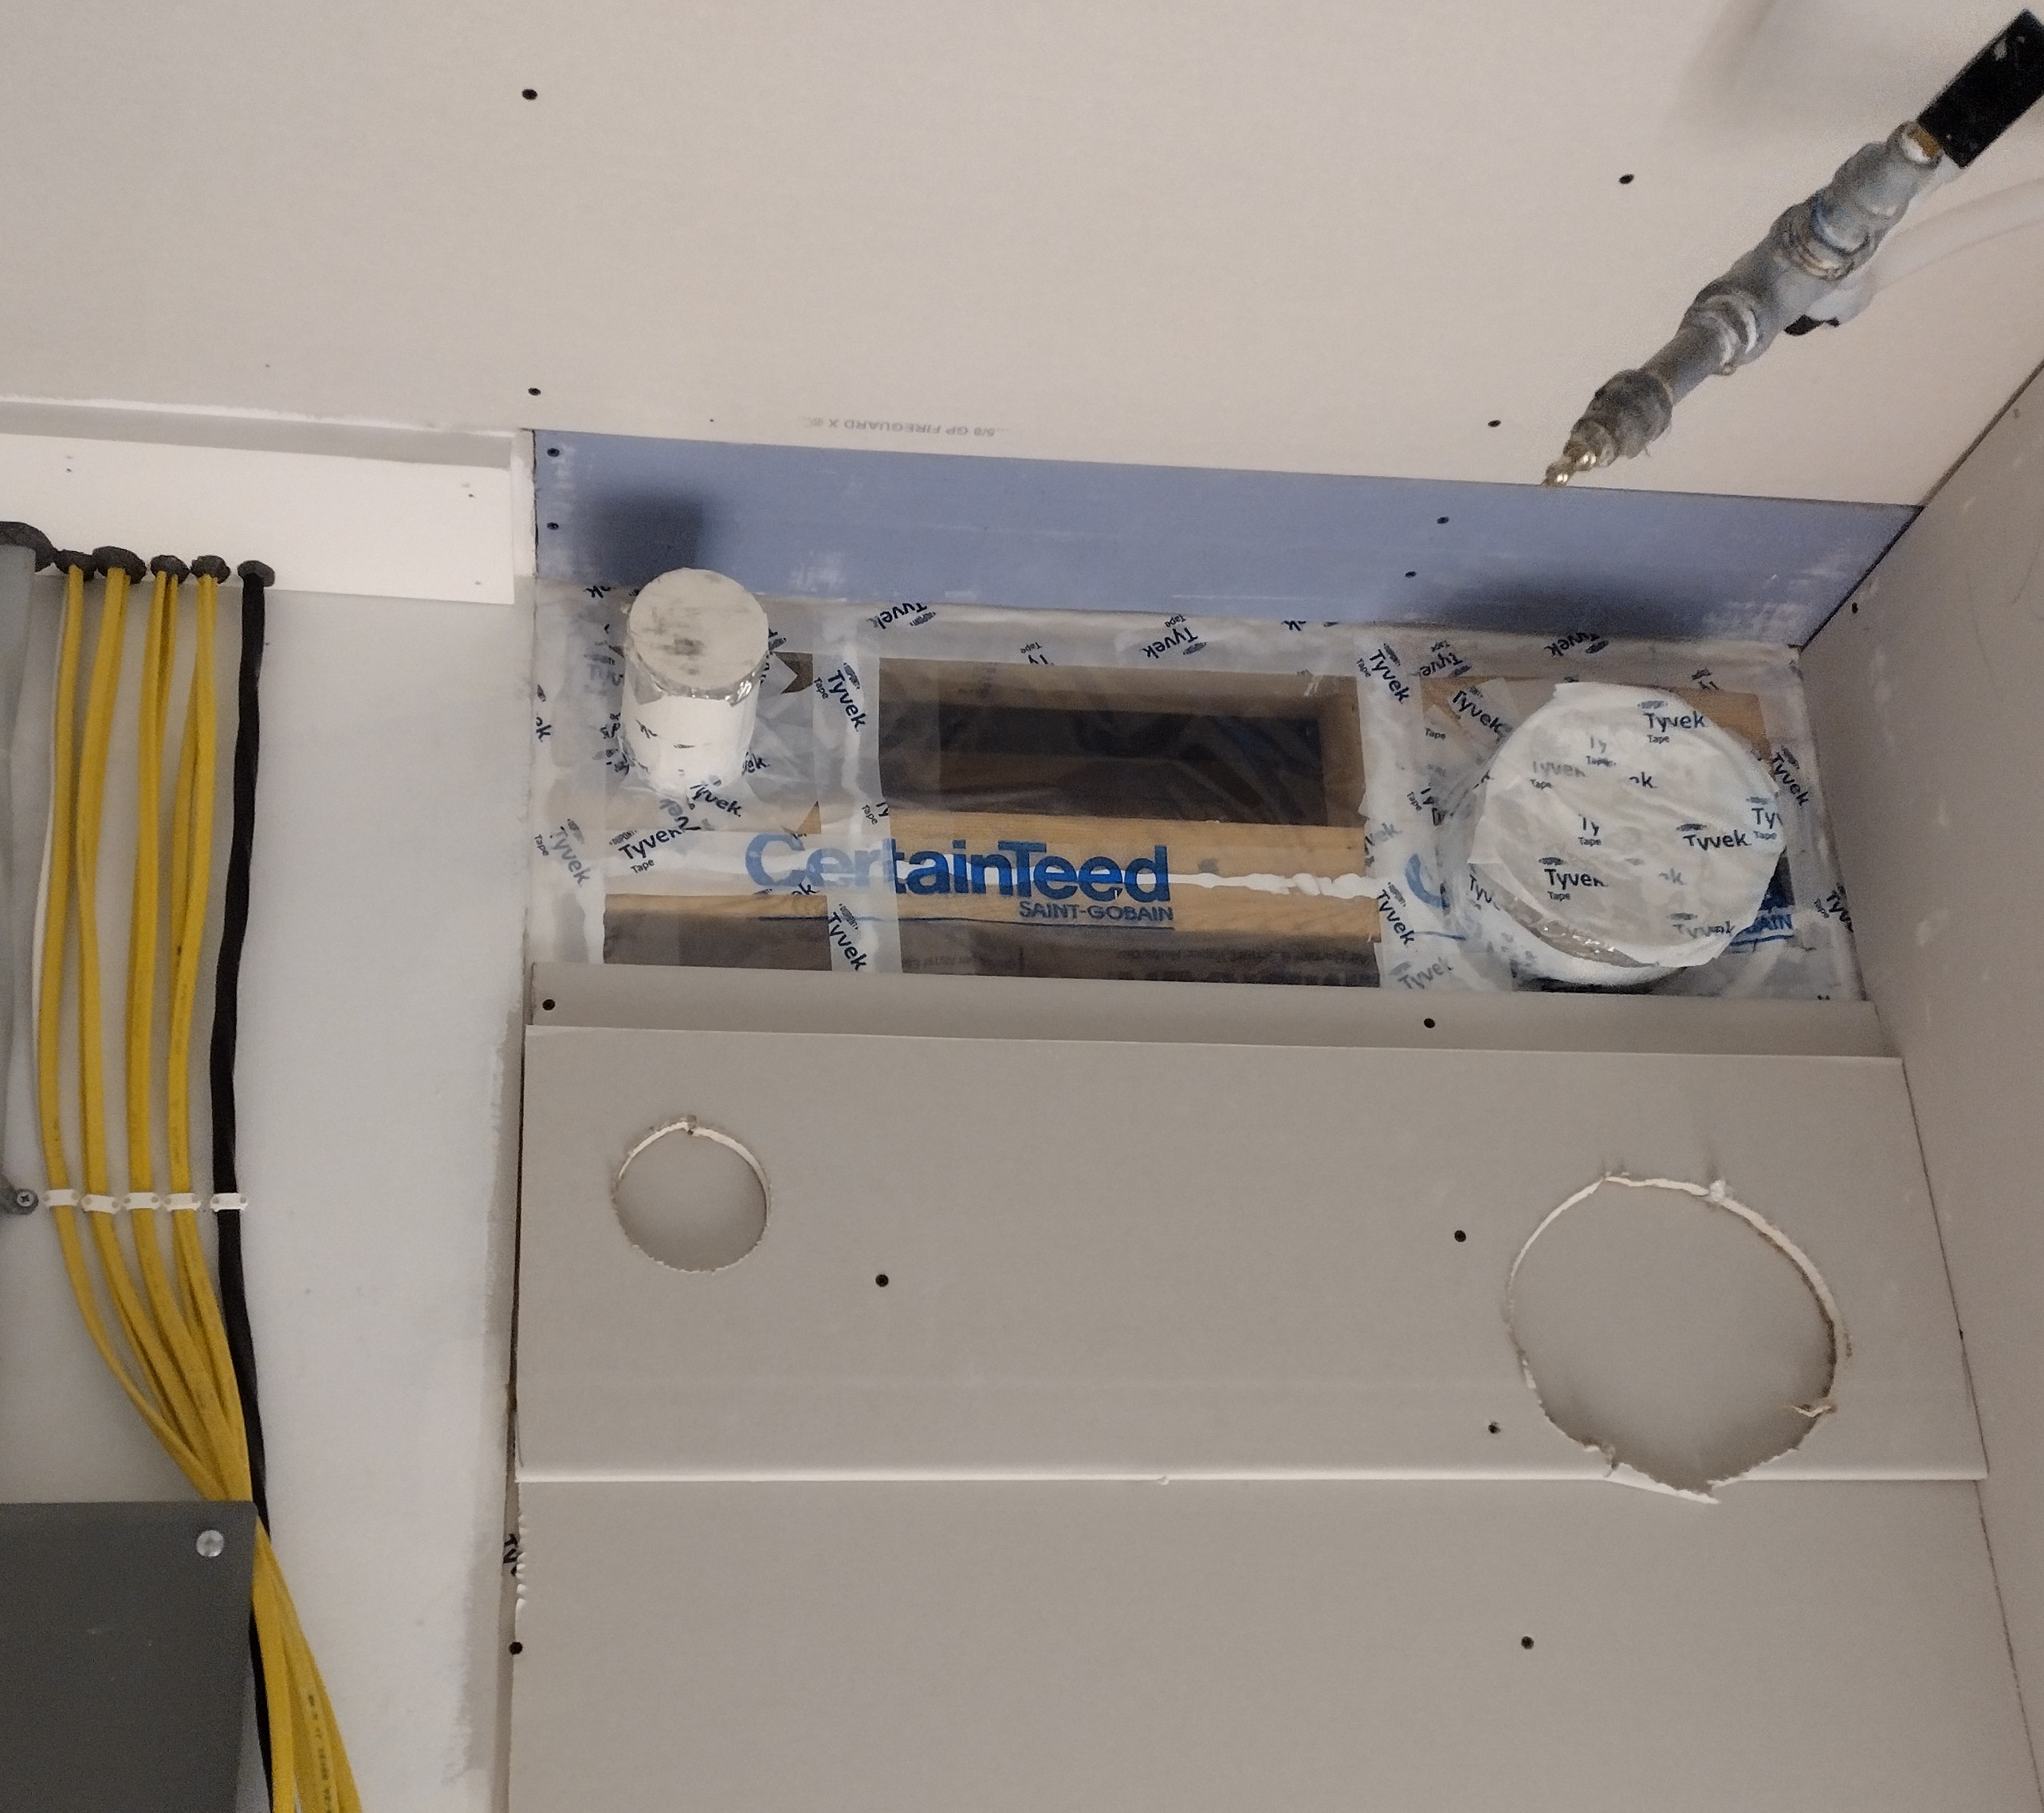
At the framing stage (before siding and drywall), I installed a white 4 inch PVC pipe to serve as a sleeve for the refrigerant lines. The picture on the left shows the sleeve just after the lines and line set cover were installed but before the matching hood was snapped into place. The picture on the right shows the sleeve taped to the vapor retarder, prior to insulation and drywall.
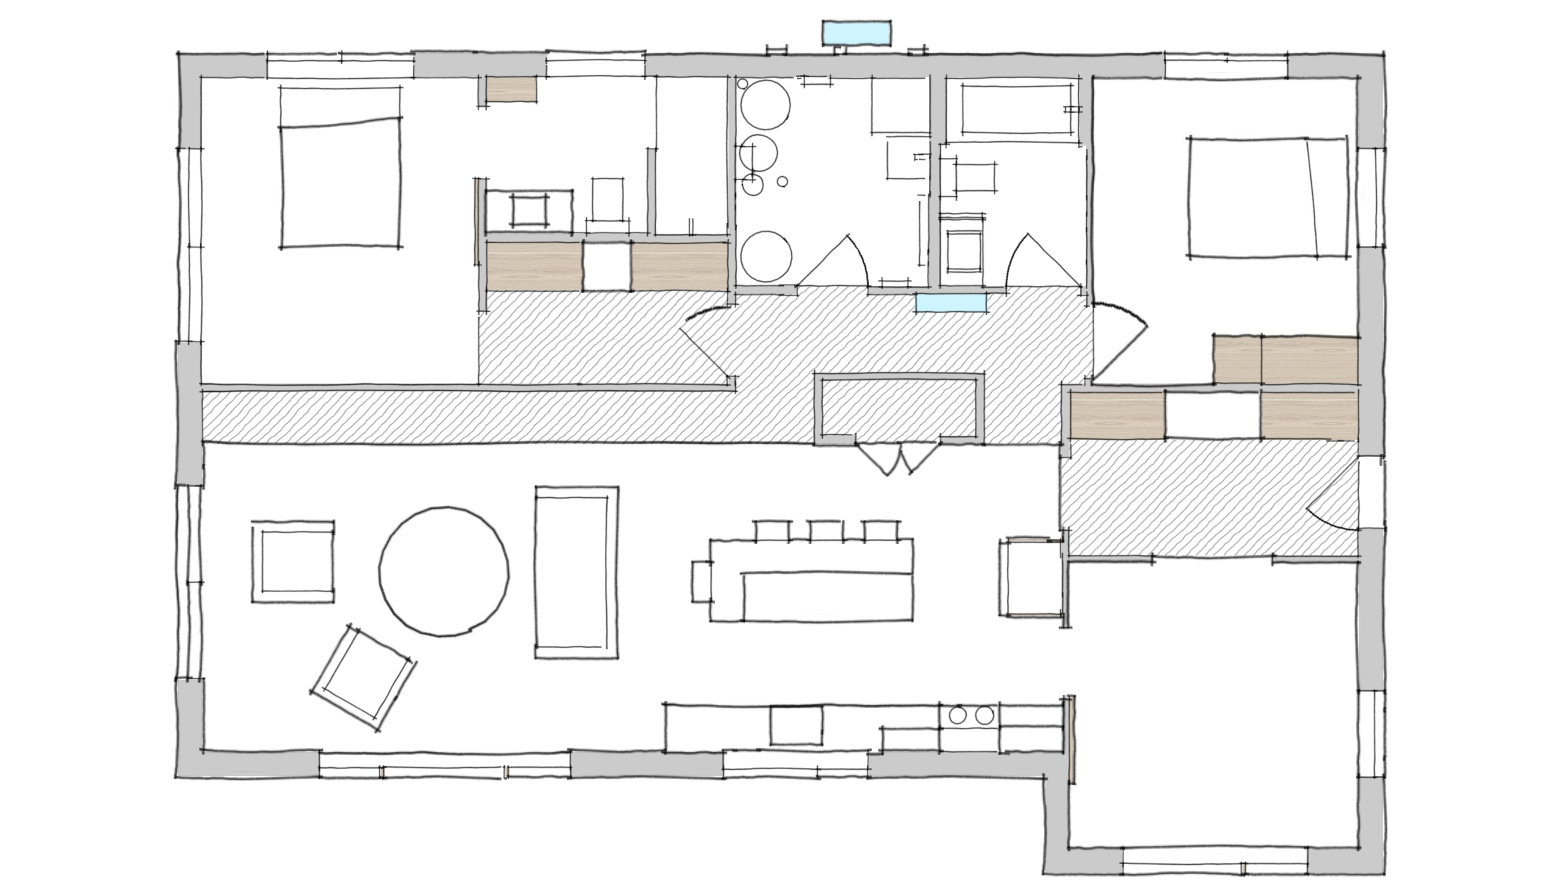
Here’s the floor plan showing the mini split heat pump highlighted in blue. The outdoor unit is located on the north wall of the mechanical room and the indoor unit is in the hallway. With bedroom and bathroom doors open and ceiling fans whirring, the heated or cooled air should circulate fairly evenly.
The home has 9 feet ceilings except in the hallway, entryway, pantry closet, and along the light shelf in the living room where it drops to 8 feet (hatched area on plan). This soffit hides the ductwork necessary to delivery fresh air to the living spaces and exhaust stale air from the bathrooms and kitchen.

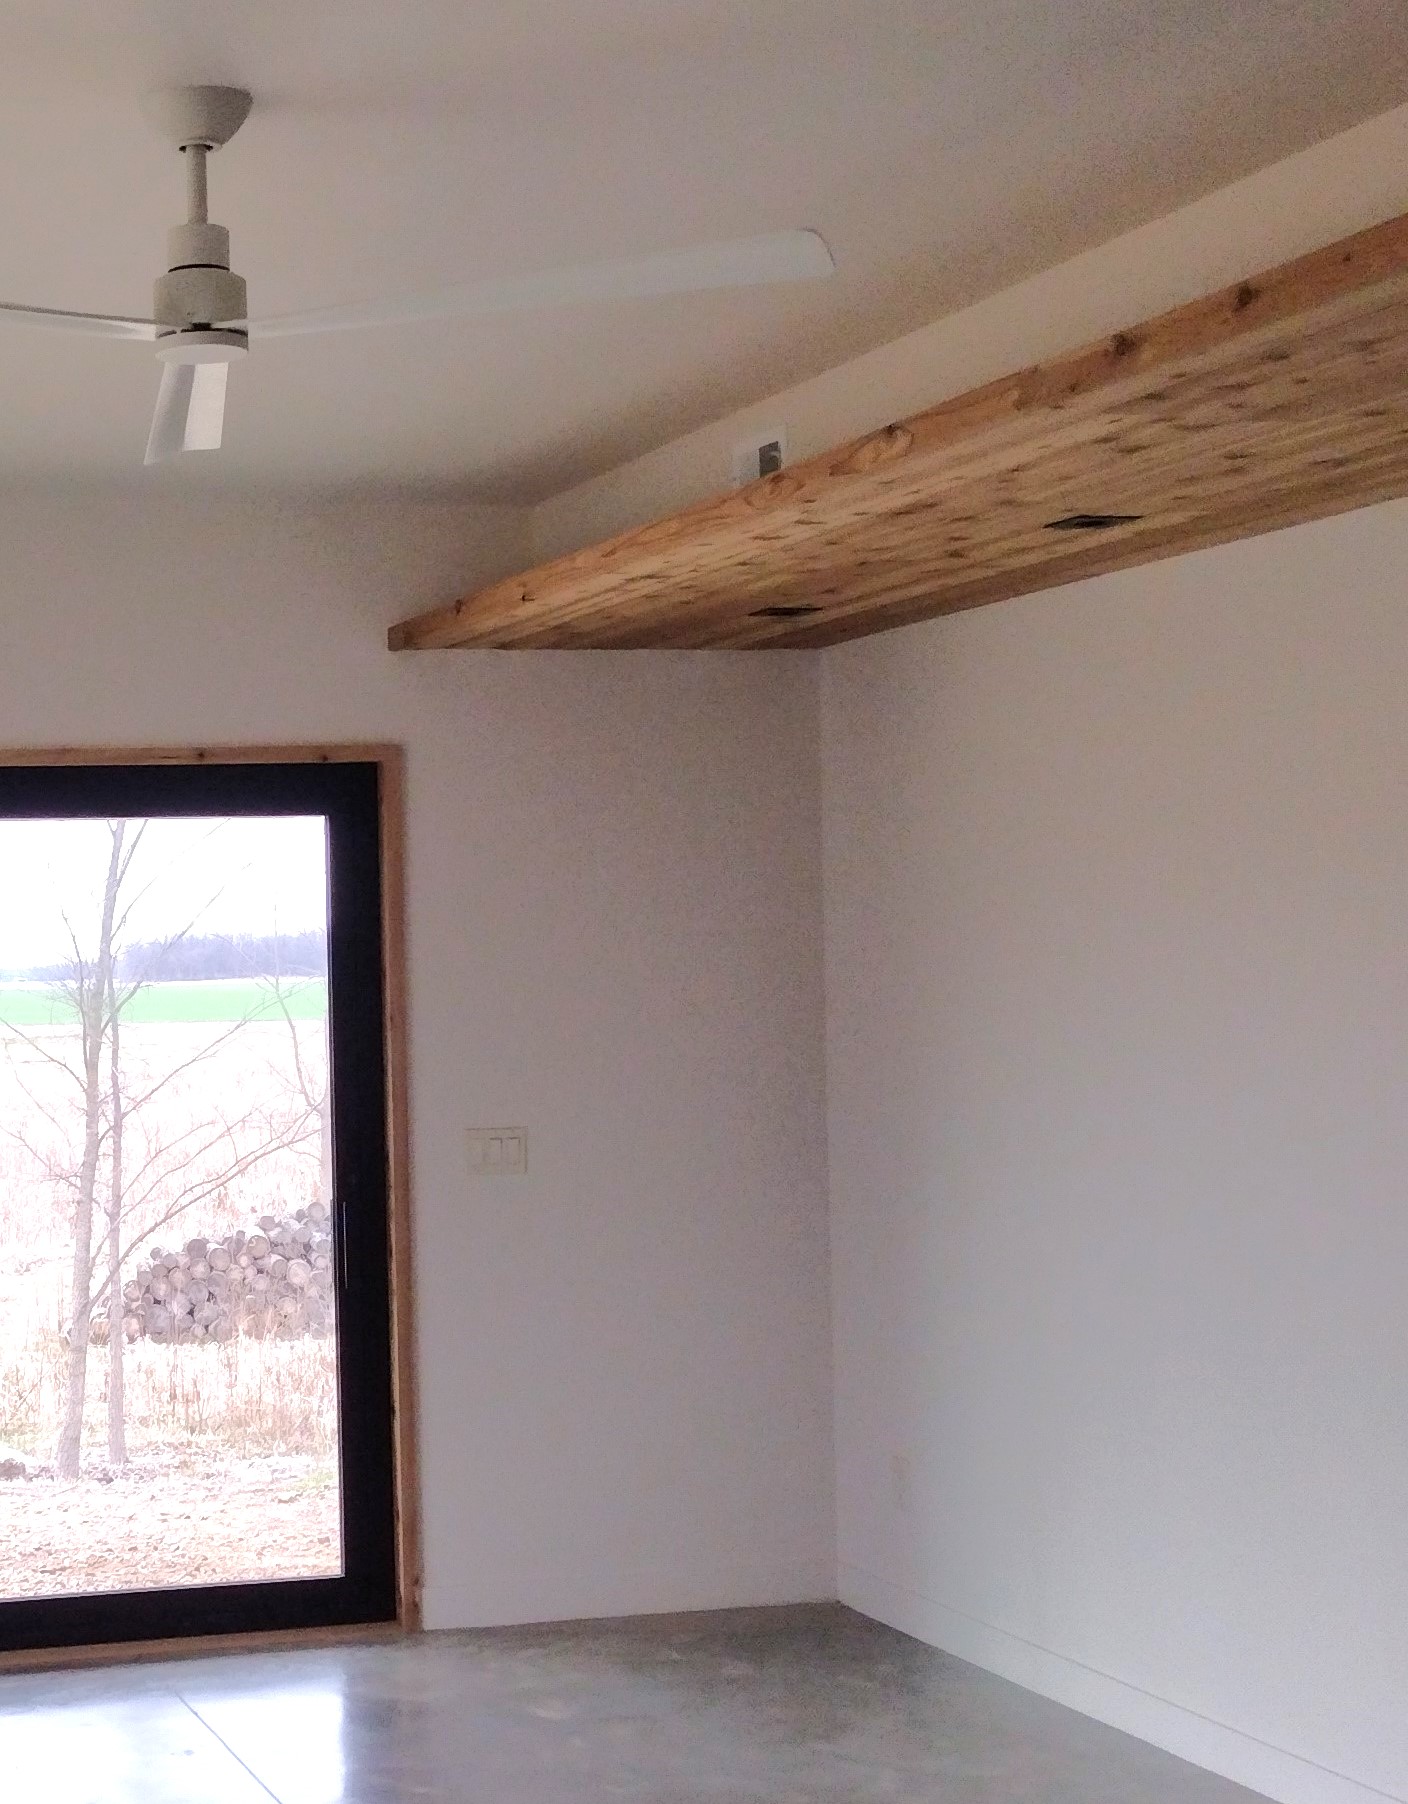
On the left you can see the skeletal frame of the soffit and how the 12 inch drop creates space for ductwork. On the right, a white fresh air register above the cedar strip light tray.

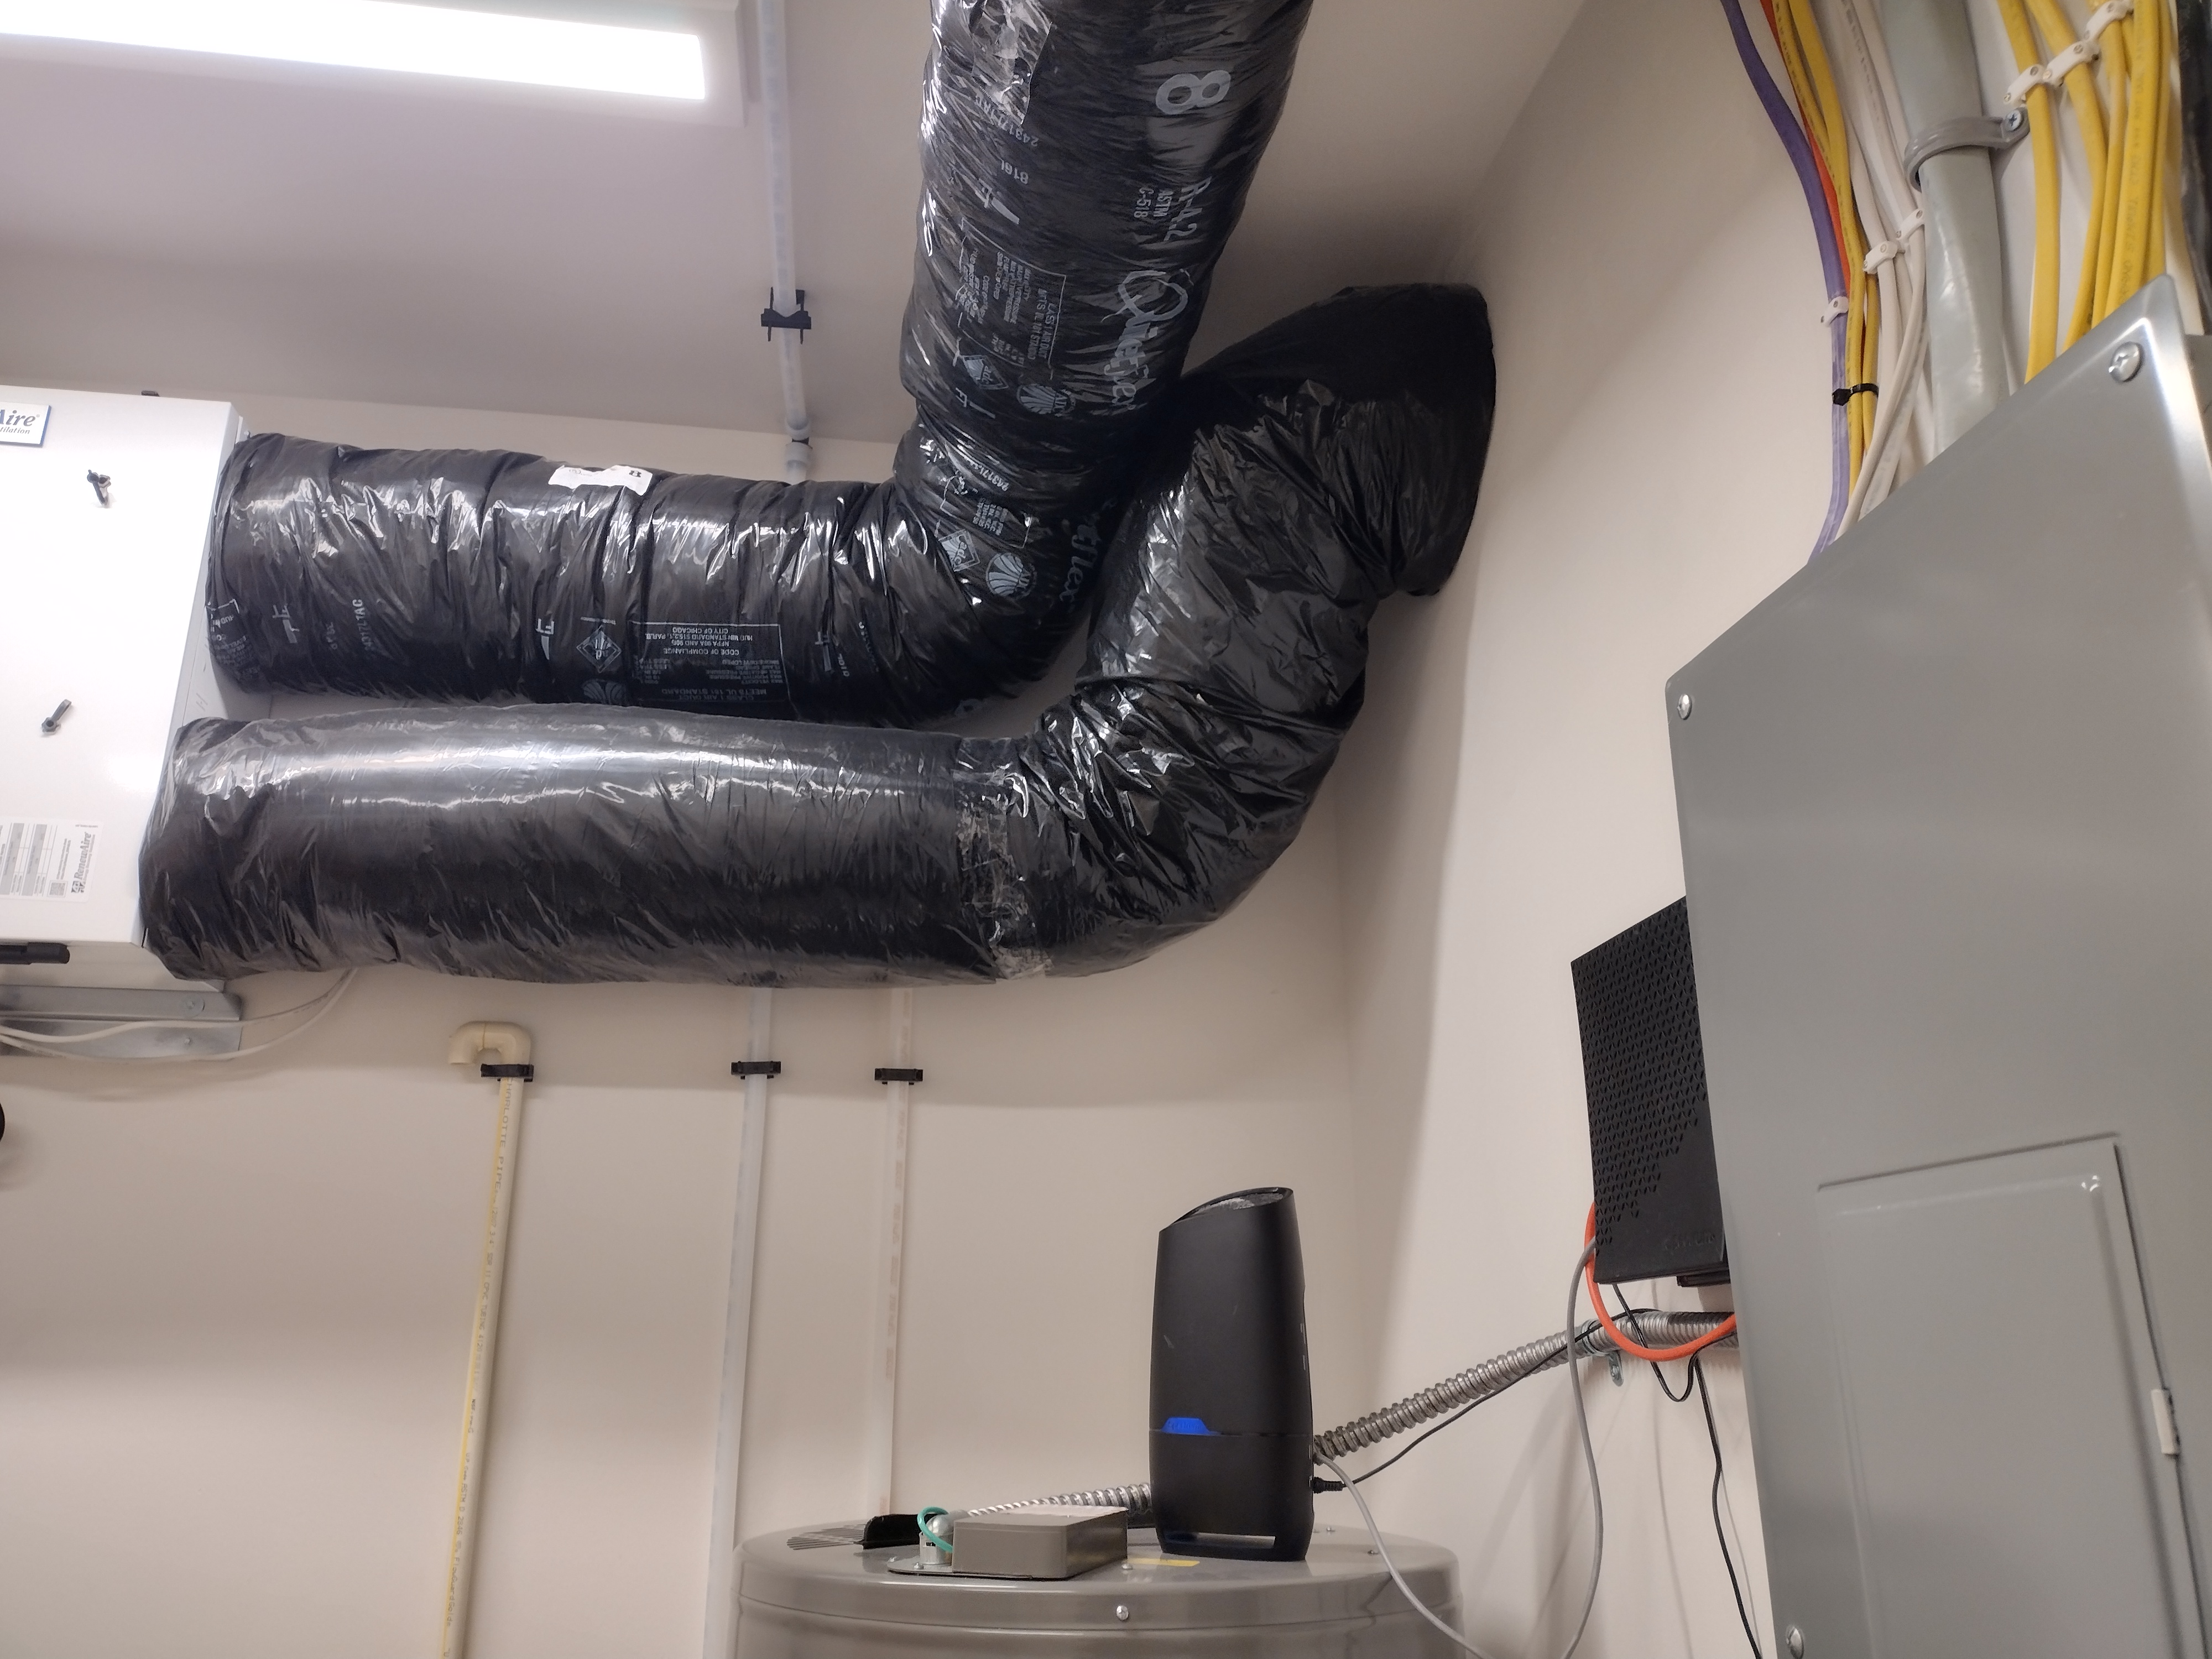
Concealed in the soffit and exposed in the mechanical room are 4 inch, 6 inch, and 8 inch rigid galvanized steel ducts that enter and exit an Energy Recovery Ventilator or ERV. I chose the RenewAire EV Premium S unit, manufactured in nearby Waunakee, Wisconsin. This unit is energy efficient to operate, relatively quiet, and can move air 30 to 130 cubic feet per minute or CFM—-an ideal range for a home this size.
The supply ducts on the left side of the unit go to the living room, dining room, and bedrooms. The exhaust ducts, also on the left side of the unit, pull stale air from the kitchen and bathrooms. One duct on the right side of the unit brings in fresh air from the north side of the house while the second duct pushes the stale air outside, about 6 feet away from the supply. Because these two ducts are in direct contact with potentially cold outside air, they are insulated to prevent condensation.
In winter, cold dry outside air is pre-heated, filtered, and humidified by the exhausting stale air from the house. The air streams bypass each other—without mixing—inside the unit. In summer, warm humid outside air is pre-cooled, filtered, and de-humidified by the exhausting stale air.
An ERV is an essential piece of equipment for an air-tight home, and should be operated continuously whenever windows are shut and the air-conditioning or heating system is running. With virtually no random leaks like an ill-fitting door sweep or an un-caulked electrical outlet, an air-tight home can’t get enough fresh air to dilute the indoor air pollutants that inevitably build up.

I began monitoring the air quality of my own home several years ago with a consumer-grade device called Awair, and it was a real eye-opener. Here’s the unit on my kitchen window sill, showing a score of 87 out of 100. Good, not great.
I found out that when more than two people visit, I better crank up the ERV to keep Carbon Dioxide or CO2 levels from spiking. CO2 is the silent but harmful byproduct of human breathing that can cause drowsiness and lethargy. Sunscreen, perfume, and cleaning products alert me to concerning levels of Chemicals and seemingly harmless slightly-burned toast calls my attention to Particulate Matter or PM 2.5’s—-all known to cause respiratory irritation and compromise the health of those with asthma or allergies.
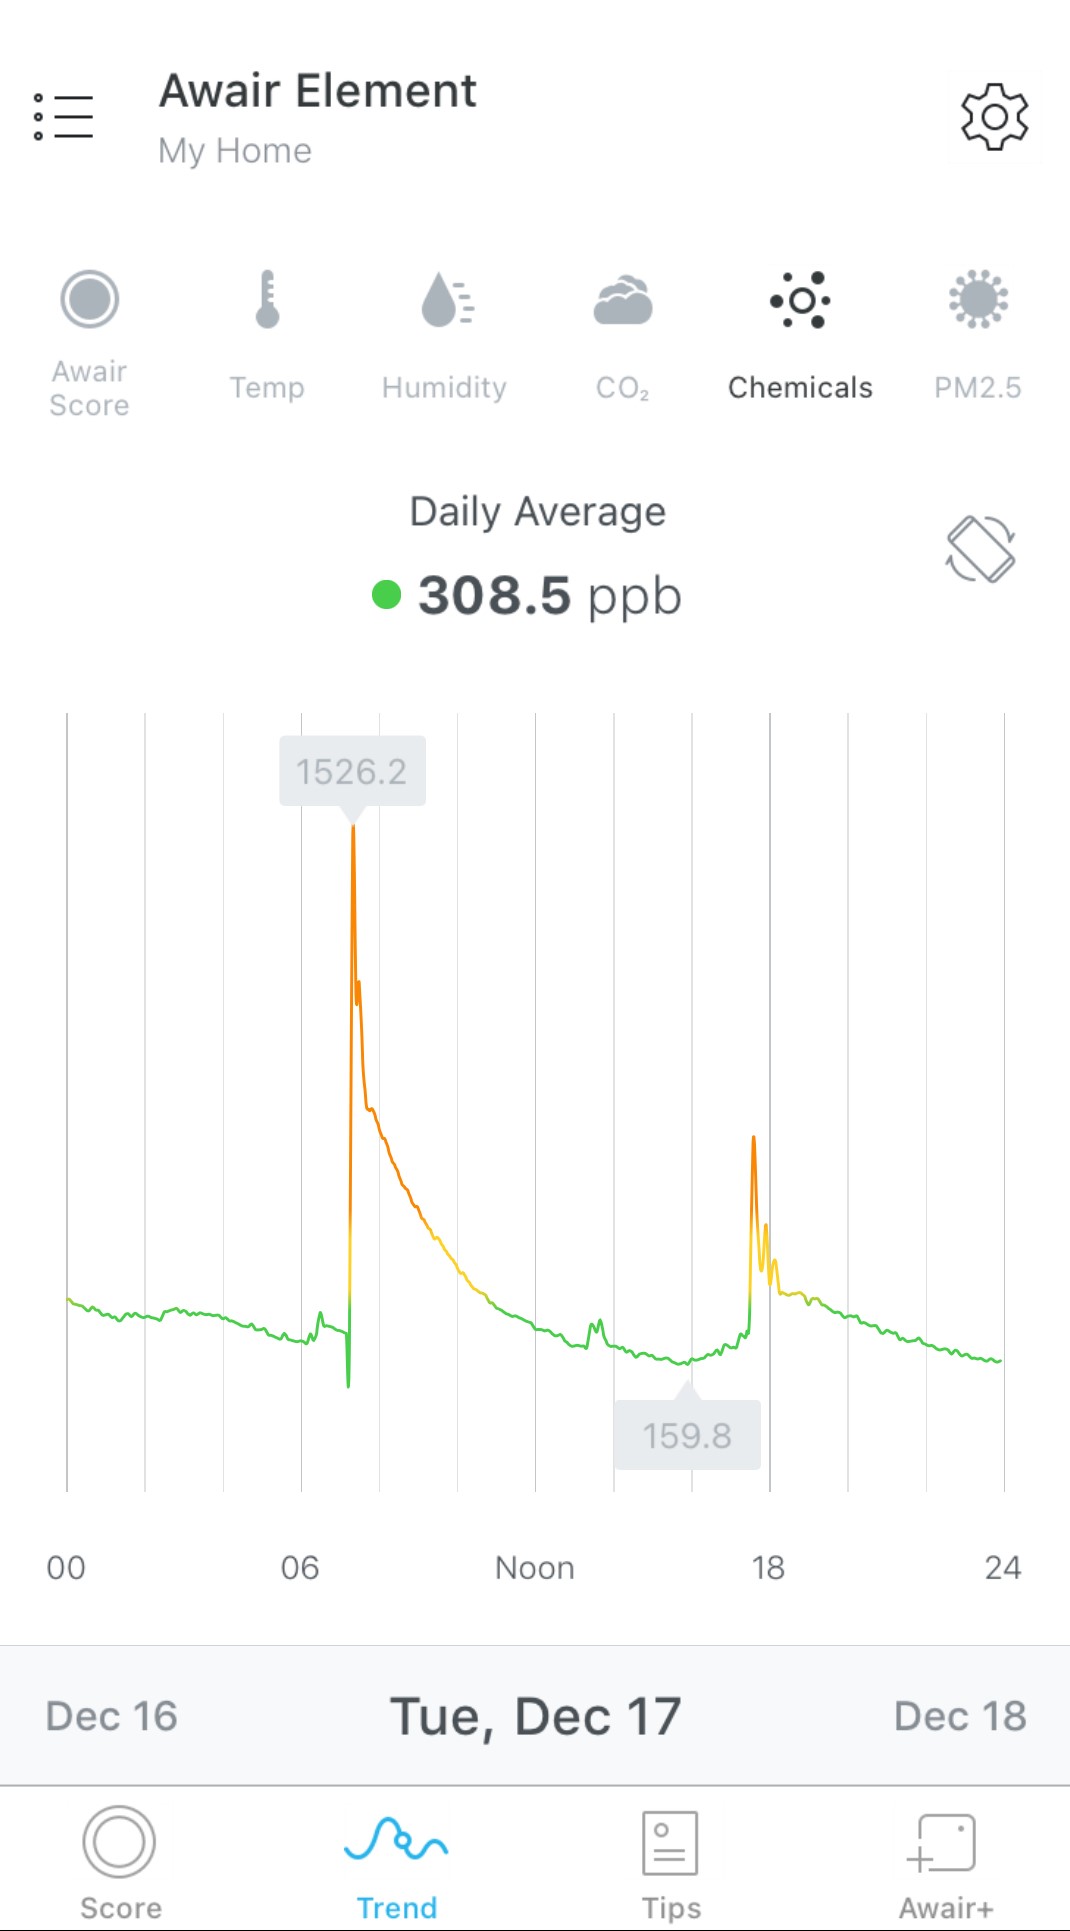
This is what happens when you burn toast (red is bad, green is good).
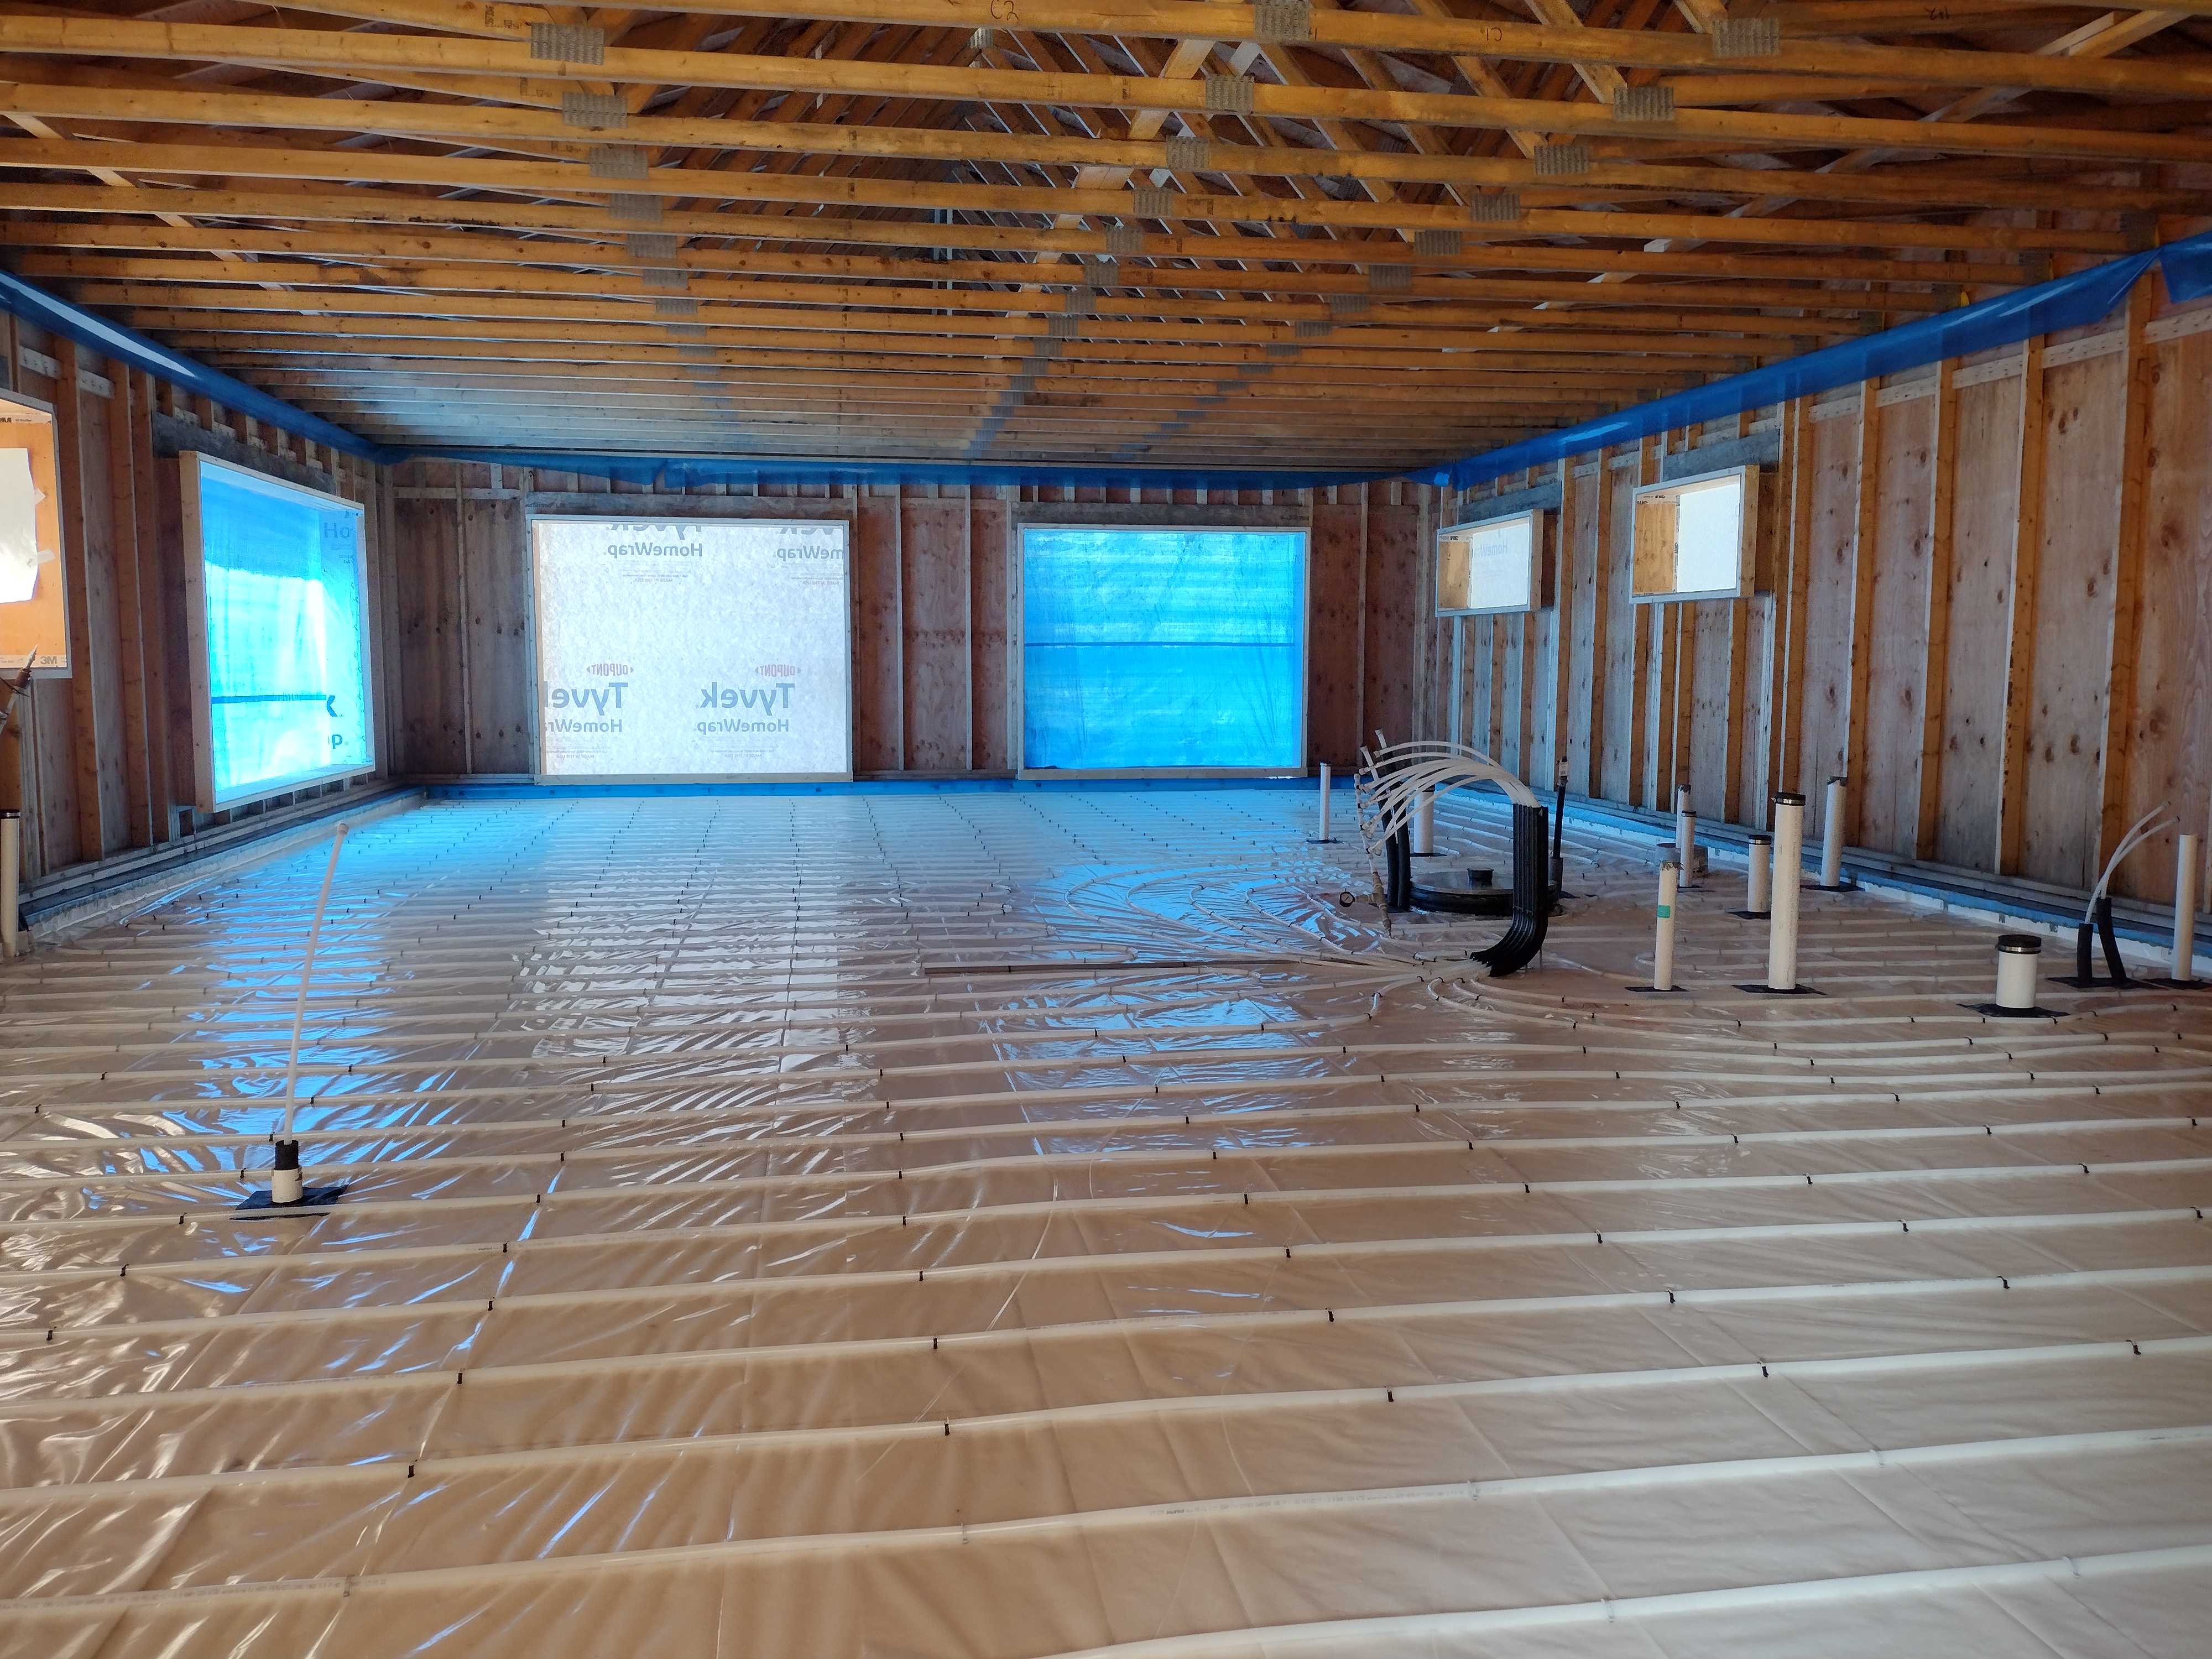
Partly for backup heat but mostly for comfort, we installed PEX tubing prior to pouring the slab.
The radiant heating system cost $13,000—a luxury upgrade that I deemed necessary after living in my own home for the last 5 years. While my air temperature may be fine, the slab is cold. There’s no way I can say my house is “cozy” in the dead of winter.
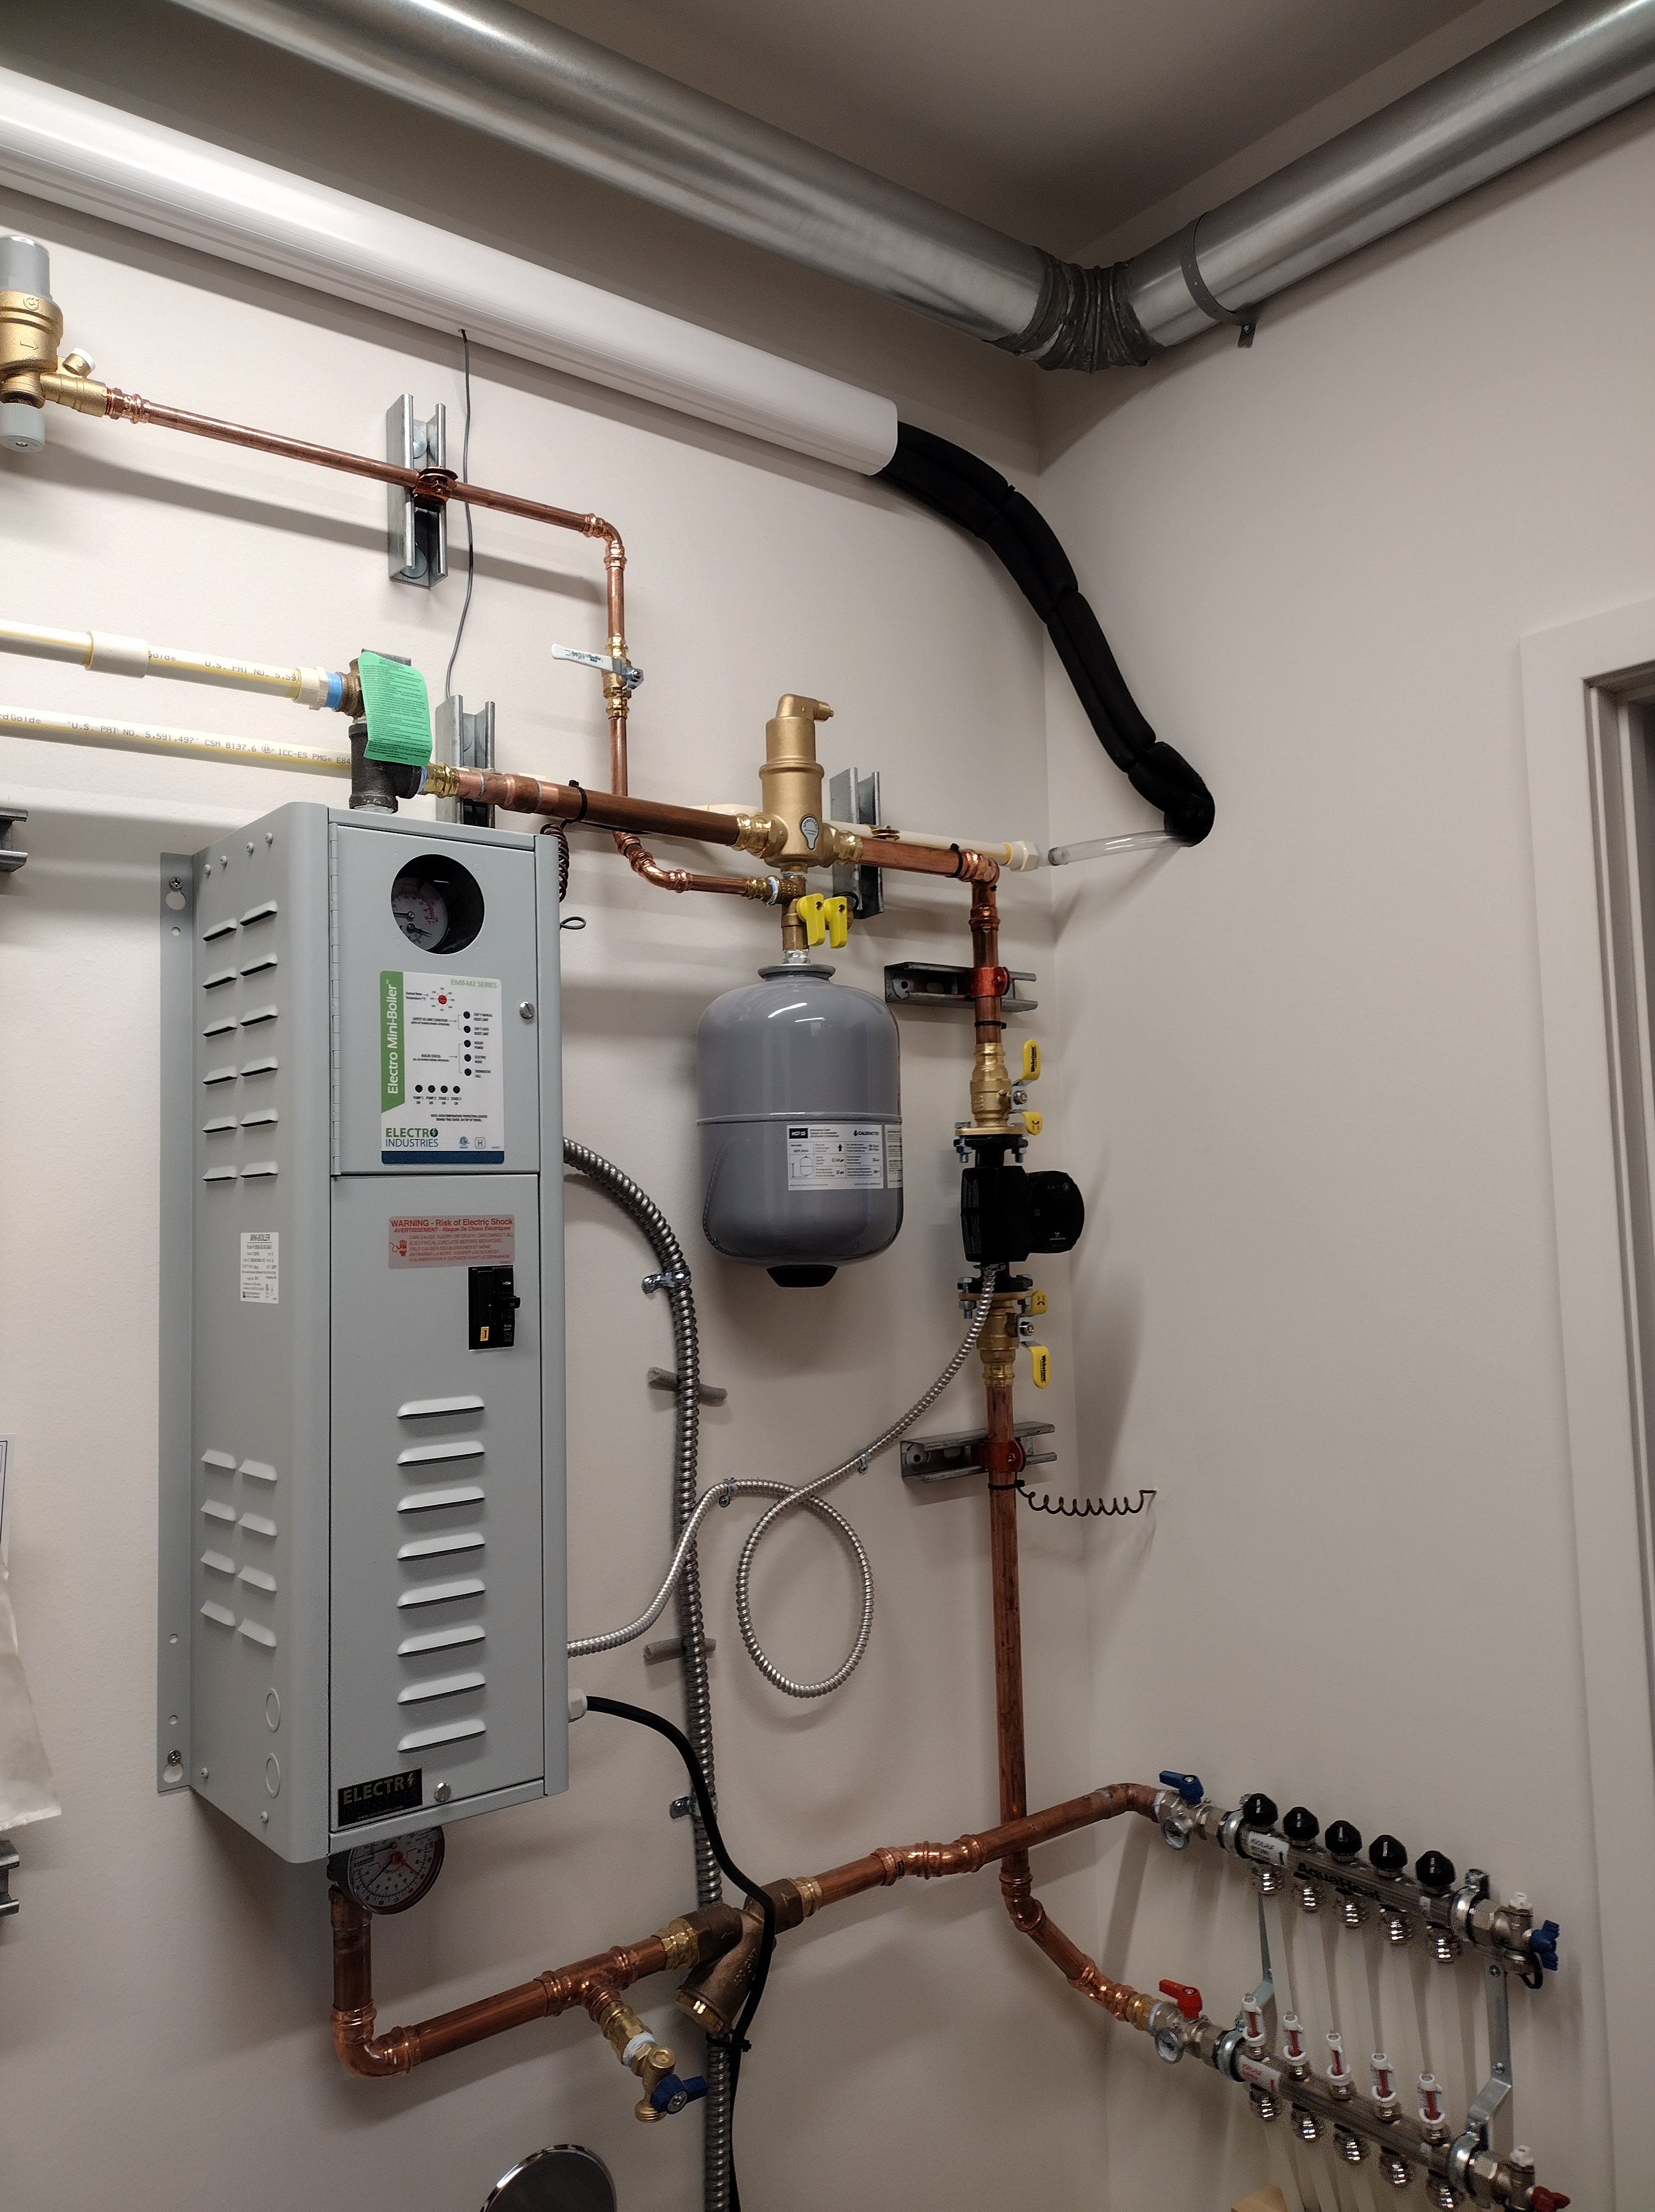
My contractor installed Electro Industries 5 kW Mini-Boiler, the electric resistance heating unit seen here along with an expansion tank, various valves, and the copper lines that connect to the PEX tubing. This set up can more than meet the Calculated Peak Load of the house, according to my REM Rate model.
I’m eager to learn how the house will function this coming winter, the first for the homeowners. The radiant slab is expected to take several days to warm up, and will probably perform best (and be most economical) when the thermostat is set several degrees below the desired air temperature. Sunny days will raise the air temperature—perhaps beyond comfort—and especially cold and windy days (even with all the extra insulation and air-sealing) will cause a drop. But that’s where the mini-split comes to the rescue—quickly ramping up with cool or warm air to even out the difference.
The Mitsubishi mini-split is by far more energy efficient than Electro’s mini-boiler. That’s because of something called the Coefficient of Performance or COP. The mini-boiler is like a toaster: it converts electrical energy directly into heat for a COP of 1. The mini-split is a heat pump that moves heat energy from one air source to another: it consumes electrical energy to run its compressor and fans but delivers several time more units of heat energy for a COP that ranges from 1.89 (at minus 13 degrees) to 4.54 (at 47 degrees).
If the home is heated solely with the radiant slab, the yearly cost is predicted to be $908
If the home is heated solely with the mini-split, the yearly cost is predicted to be $447
A happy outcome may be for the radiant slab to satisfy 1/3 of the heating demand while the mini-split makes up the rest, for a yearly cost of $591
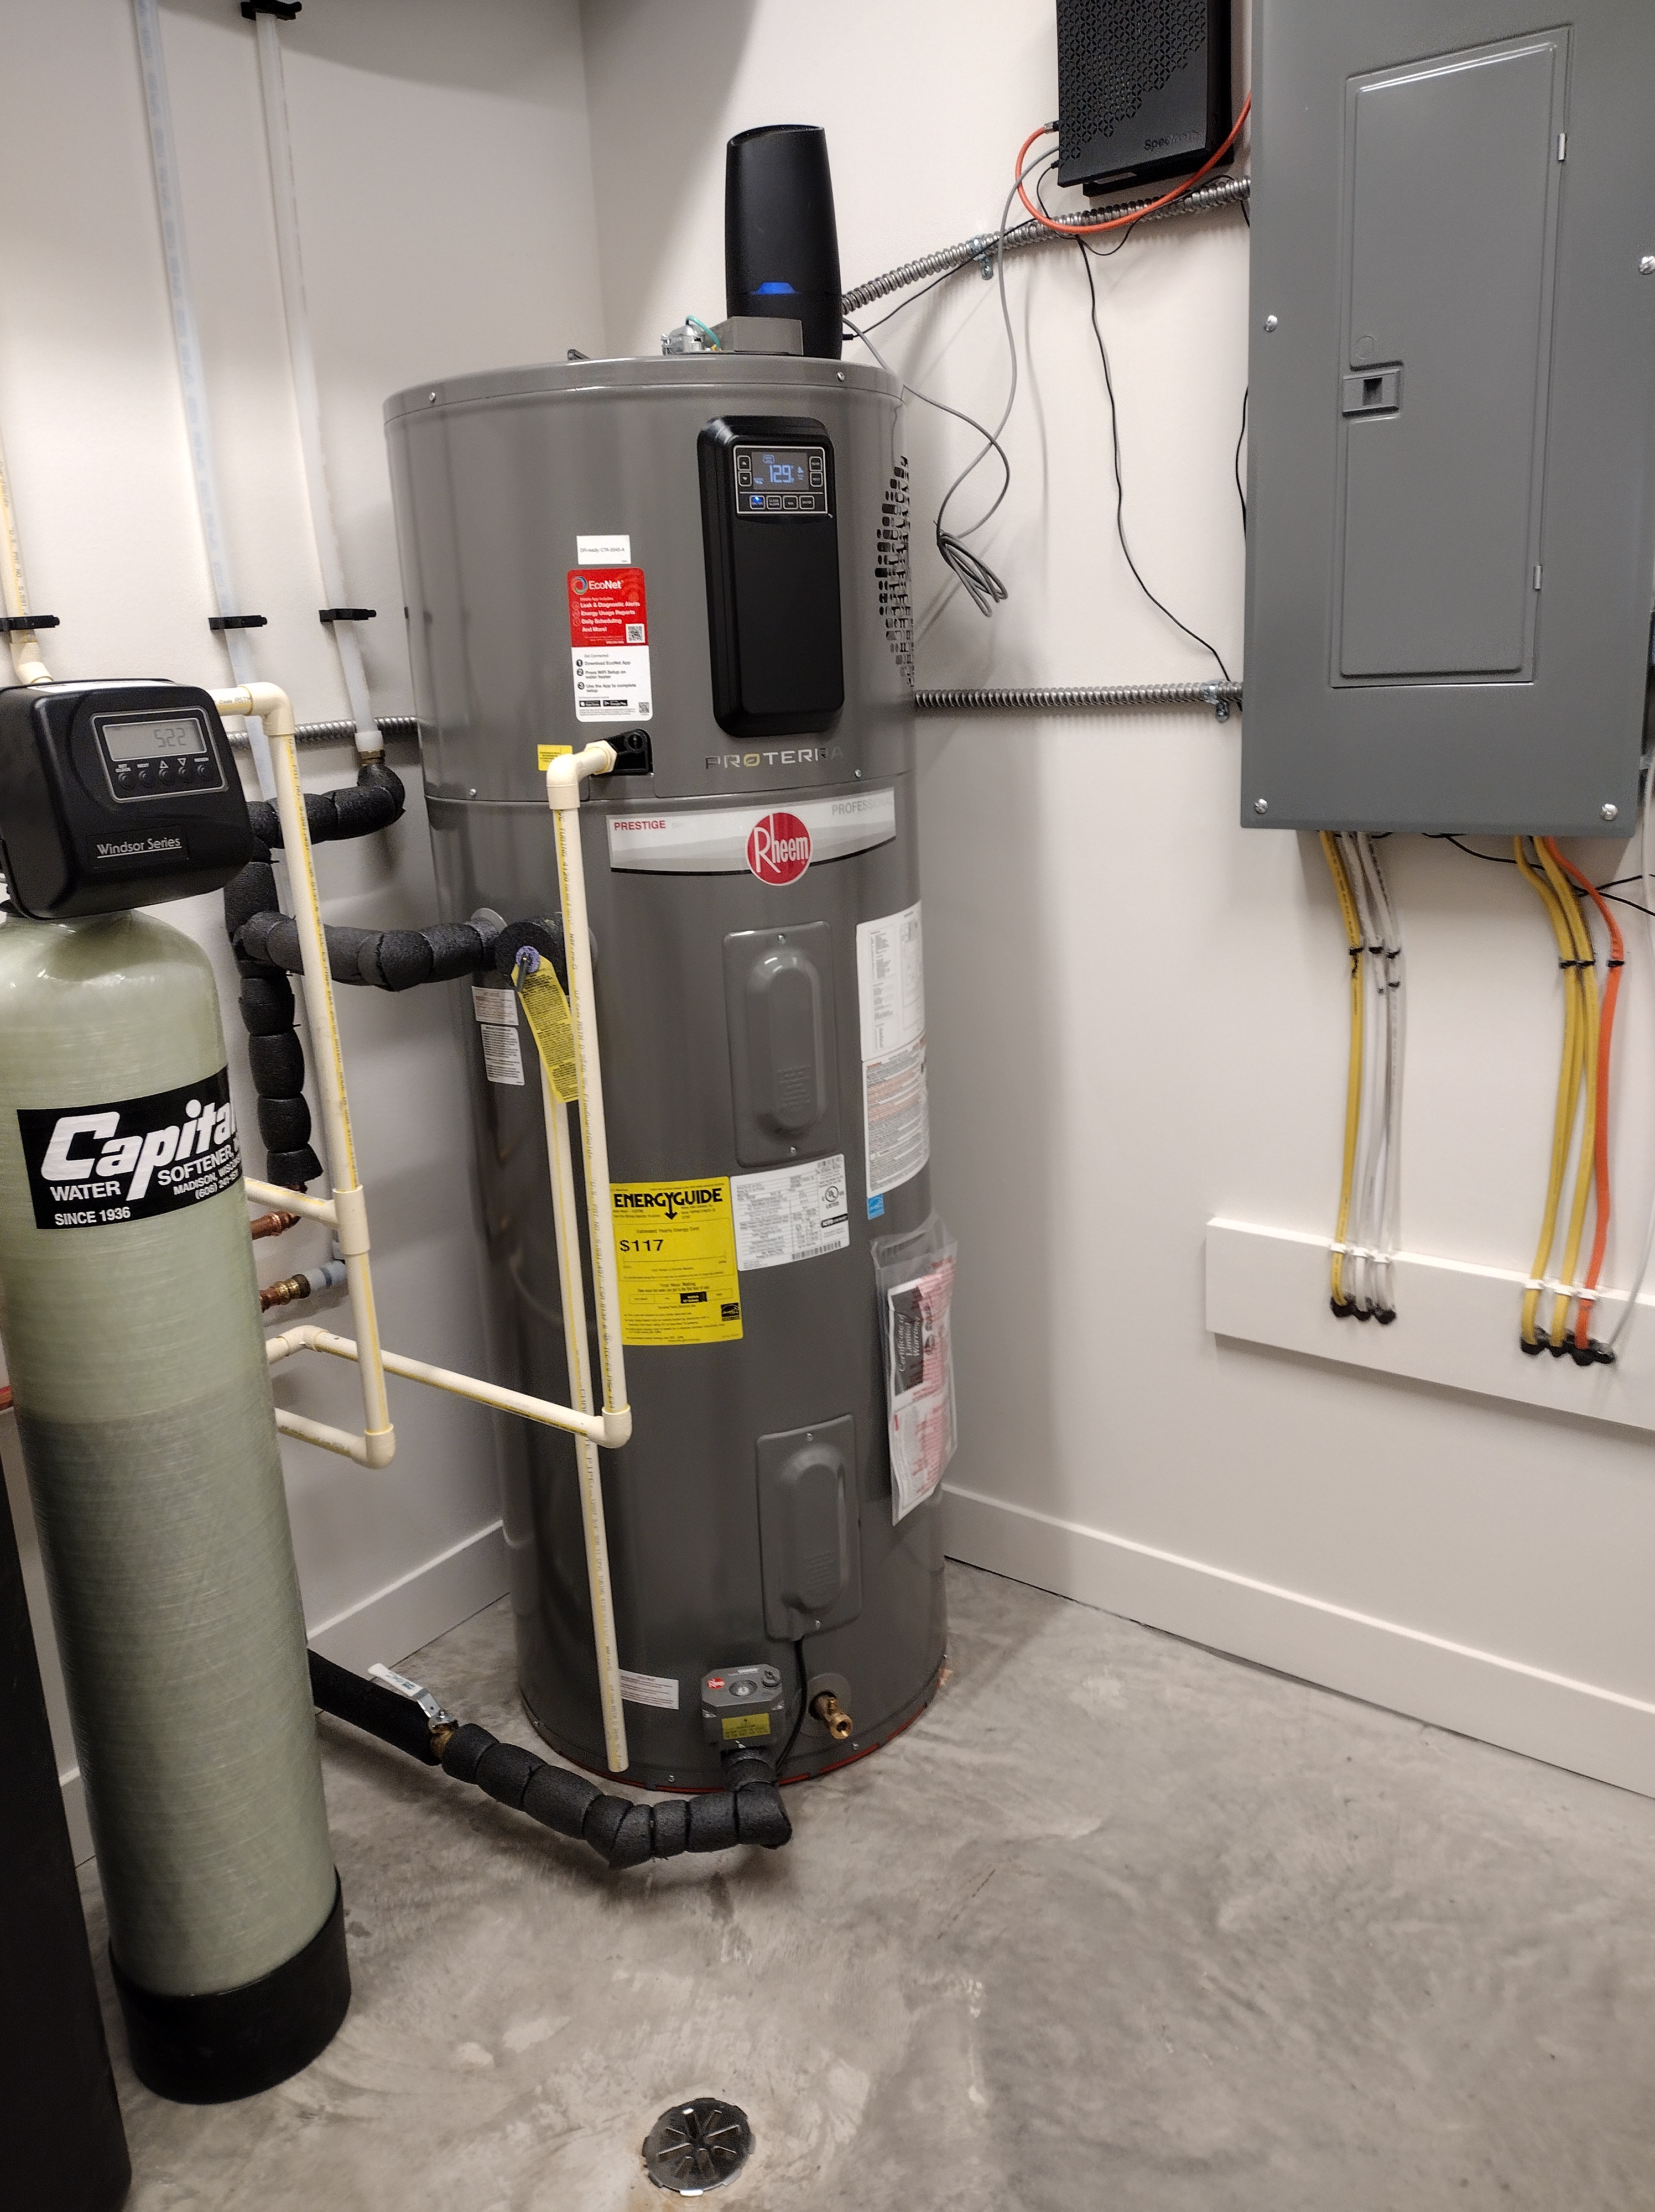
For domestic hot water, I chose Rheem’s Prestige ProTerra Hybrid Electric Heat Pump. The heat pump technology greatly reduces yearly electricity costs. We also installed a 0.4 gallons-per-minute Point-of-Use tankless water heater from Eemax under the kitchen sink, for instant hot water sufficient for washing hands or a few dishes. To the left of the Rheem hot water heater is a standard water softener system.
Water heating is predicted to cost $72 per year.
A conventional electric resistance hot water heater would cost the homeowner $312 per year.
When I first began learning about net-zero energy homes and how to design them, I focused on the building envelope. As an experienced designer of conventional homes, I was well versed in foundations, framing, insulation, windows, and finishes. What I didn’t know about (and didn’t really want to know about?) was mechanical systems. I was an aesthete.
Little did I realize that mastering the building envelope is the easy part: the hard part is matching the low heating and cooling loads of my homes to appropriately sized equipment that is both affordable and locally available. Please let me know if you have any questions about what I’ve selected or any feedback that may help me help my future homeowners.
For reliably helpful articles about building science and other green building topics, my go-to is Green Building Advisor. There’s a paywall but also a lot of free articles. It’s worth checking out.
